haven’t posted in a while…not all that sorry…
Mom wanted an ornament for her gift so I decided to print one.
Need:
- 3D file of ornament (something like this should work: http://www.thingiverse.com/thing:33960)
- 3d printer
- micro-controller (gemma – http://www.adafruit.com/product/1222)
- ws2812 or ws2811 leds (something like this: https://www.sparkfun.com/products/12025)
- 9v battery
- 9v battery power plug
- 5v regulator
- 1000uf capacitor
- 270 ohm resistor
- wire
- wire cutters
- soldering station
Assembly (general overview):
- Hollow out the ornament to make space for the electronics (available here: http://www.thingiverse.com/thing:623016)
- Print the piece, I made the ornament roughly 6 inches in diameter and could print the entire body in a single print (20-30 hours!)
- Assemble the electronics
- Insert electronics into the ornament and attach the battery
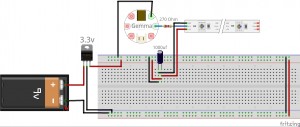
The electronics are assembled as such:
The idea is to put the capacitor as close the the led strip as possible to eliminate the possibility of a voltage spike that will fry your leds. Also, its just a good practice to add a resistor between the signal on the microcontroller and the leds. In this case it probably wont make a difference, but lets get in the habbit.
Basically, power feeds from the 9V power supply to the 3.3v linear regulator. The output of which is fed to the micro-controller and leds (with the addition of a capacitor across the 3.3V and GND wires). The signal for led control is generated by the gemma. All the grounds are connected and your are good to go!
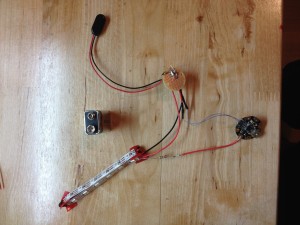
You should assemble these electronics similar to the picture show below. I arranged my led strip in a triangular fashion so it would fit snuggly in the ornament (about 6 inch diameter).
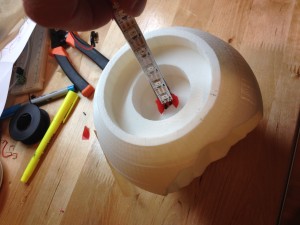
Insert the leds into the ornament:
Super glue the top of the ornament on and you are good to power it up. The only thing you need to do is upload the sketch to the gemma. More can be found here on how to do it: https://learn.adafruit.com/introducing-gemma/about-the-bootloader. Basically, just plug in the mini usb, download adafruits version of arduino ide and select the gemma board and under “tools” => “programmer” => “USBTinyISP”. Then just make sure you hit the reset button so the red light is blinking and upload.
Below is the code im using for a cycle of colors:
#include <Adafruit_NeoPixel.h>

#define PIN 1

// Parameter 1 = number of pixels in strip
// Parameter 2 = pin number (most are valid)
// Parameter 3 = pixel type flags, add together as needed:
//   NEO_KHZ800  800 KHz bitstream (most NeoPixel products w/WS2812 LEDs)
//   NEO_KHZ400  400 KHz (classic 'v1' (not v2) FLORA pixels, WS2811 drivers)
//   NEO_GRB     Pixels are wired for GRB bitstream (most NeoPixel products)
//   NEO_RGB     Pixels are wired for RGB bitstream (v1 FLORA pixels, not v2)
Adafruit_NeoPixel strip = Adafruit_NeoPixel(18, PIN, NEO_GRB + NEO_KHZ800);

void setup() {
  strip.begin();
  strip.show(); // Initialize all pixels to 'off'
}

void loop() {
  // Some example procedures showing how to display to the pixels:
//  colorWipe(strip.Color(0, 0, 255), 3000); // Red
//  colorWipe(strip.Color(0, 255, 0), 50); // Green
//  colorWipe(strip.Color(0, 0, 255), 50); // Blue
  rainbow(1200);
  rainbowCycle(20);
}

// Fill the dots one after the other with a color
void colorWipe(uint32_t c, uint8_t wait) {
  for(uint16_t i=0; i<strip.numPixels(); i++) {
      strip.setPixelColor(i, c);
      strip.show();
      delay(wait);
  }
}

void rainbow(uint8_t wait) {
  uint16_t i, j;

  for(j=0; j<256; j++) {
    for(i=0; i<strip.numPixels(); i++) {
      strip.setPixelColor(i, BlueWheel((i+j) & 255));
    }
    strip.show();
    delay(wait);
  }
}

// Slightly different, this makes the rainbow equally distributed throughout
void rainbowCycle(uint8_t wait) {
  uint16_t i, j;

  for(j=0; j<256*5; j++) { // 5 cycles of all colors on wheel
    for(i=0; i< strip.numPixels(); i++) {
      strip.setPixelColor(i, Wheel(((i * 256 / strip.numPixels()) + j) & 255));
    }
    strip.show();
    delay(wait);
  }
}

// Input a value 0 to 255 to get a color value.
// The colours are a transition r - g - b - back to r.
uint32_t Wheel(byte WheelPos) {
  if(WheelPos < 85) {
   return strip.Color(WheelPos * 3, 255 - WheelPos * 3, 0);
  } else if(WheelPos < 170) {
   WheelPos -= 85;
   return strip.Color(255 - WheelPos * 3, 0, WheelPos * 3);
  } else {
   WheelPos -= 170;
   return strip.Color(0, WheelPos * 3, 255 - WheelPos * 3);
  }
}

uint32_t BlueWheel(byte WheelPos) {
  if(WheelPos < 85) {
   return strip.Color(WheelPos * 3, 0, 255 - WheelPos * 3);
  } else if(WheelPos < 170) {
   WheelPos -= 85;
   return strip.Color(255 - WheelPos * 3, 0, WheelPos * 3);
  } else {
   WheelPos -= 170;
   return strip.Color(WheelPos * 3, 0, 255 - WheelPos * 3);
  }
}
That’s it! You should have a printed ornament, assembled custom electronics and code to match! total work to assemble this is about 3 hours (not counting time to print).


