Allow Password SSH Access on Your Ec2 Server

It’s real easy. For passwort logins edit /etc/ssh/sshd_config and set “PasswordAuthentication” to “yes”, issue a “/etc/init.d/ssh reload” for the new config to become active. But a much better solution is to use ssh keys. Password access should only be allow temporarily. You should also have a rule set up in your firewall (I prefer CSF) that blacklists an IP if they attempt to enter a password more than 5 times in short succession.

That’s it, short and sweet.

Handling Pre-populated Form Fields

I’m working on something right now where I needed a quick and dirty way to make form fields go blank when a user clicks on them and then re-populate if they don’t enter any text.

I know this is standard behavior right now, but I’ve always had a personal javascript library that I use to handle these sort of interactions. However, in this case, I can’t use it. So here’s my snippet for the day.

$('input[type=text]').focus(function() {
                        var val = $(this).attr('value');
                        
                        $(this).attr('value', '');
                        
                        $(this).blur(function() {
                            if($(this).val() == '') {
                                $(this).attr('value', val);
                            }
                            
                        });
                        
                    });

It just listens for a user’s click on a form field and stores the value, then sets the value to be blank. It also sets up another event in which the user “blur’s” or clicks on something else on the page. In this case, it checks to see if the user has entered anything. If they haven’t we set the form field value to it’s original.

NOTE: this requires the jQuery library.

Embed a Google Hangout Session on Your Website

Lately I’ve been getting alot of questions about an embeddable hangout on your personal/company site. While there’s not currently a way to do this through the google platform. There is a way to do this through some clever albeit inconvenient hack.

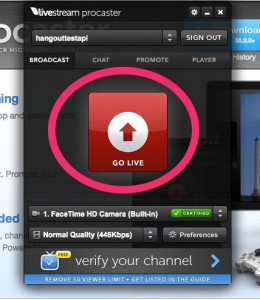
Get Live Stream Procaster (http://www.livestream.com/platform/procaster)


Stream your Desktop.

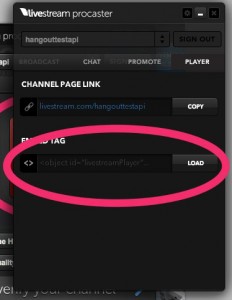
Get the embed code from the procaster screen and embed it on your site.

I know its a pain in the arse. But for now, it’s what we have to work with. It’s a bit delayed as well and users will only be able to spectate the hangout, they must join to participate.

Buttonizer

I haven’t had much time to post lately, but here’s something I’ve been playing around with. It basically takes an image you upload and turns it into a randomly scattered mosaic of buttons! I don’t know why….

Demo

It basically just moves your uploaded image to canvas where we can gather pixel information. Based on the color of the pixel we insert a button in that location with the same color. I think it looks more like rain, so I may try to modify this script to perform a similar effect with a liquid form like paint or something. Anyway, Mr. Doob and his webGL posse are coming out with cooler shit that this anyway, but if you still want to know how to do it, I packaged a nice class for you to play with (I didn’t clean any of this up so there are several variables that I’m not using…I’ll clean it up later..maybe).

/*
 * Mike Newell
 * https://iwearshorts.com
 * 
 * Licensed under the "Whatever" License - which means I don't care what you do 
 * with this. It'd be cool to get some credit, but if you don't want to be cool
 * that's cool too.
 *
 * getImageData(x1, y1, x2, y2)
 * 
 * clearRect(x, y, w, h)
 * 
 * putImageData(data, x, y)
 **/

var Buttonizer = {
    c: document.getElementById("fox-canvas"),
    c2: document.getElementById("fox-canvas2"),
    ctx: {},
    ctx2: {},
    img: document.getElementById("fox-image"),
    imgData: {},
    pixelArr: [],
    memory: [],
    pixel: 0,
    remainder: 0,
    x: 0,
    y: 0,
    random: 25,
    size: 0,
    opacity: 1,
    PI2: Math.PI*2,
    radius: 0,
    angle: 0,
    on: true,
    count: 0,
    cx: 0,
    cy: 0,
    x2: 0,
    y2: 0,
    spiral: true,
    overlay: document.getElementById("button-overlay"),
    overlay2: document.getElementById("button-overlay2"),
    overlay3: document.getElementById("button-overlay3"),
    newPixel: {},
    init: function() {
        this.setDimensions();
        this.ctx = this.c.getContext("2d");
        this.ctx2 = this.c2.getContext("2d");
        this.buttonize();
    },
    setDimensions: function() {
        this.c.width = this.img.width;
        this.c.height = this.img.height;
        this.c2.width = this.img.width;
        this.c2.height = this.img.height;
        
        this.size = Math.floor(Math.random()*5+(this.c.width / (.12*(this.c.width))));
    },
    setCenter: function() {
        this.cx = Math.floor(this.c.width / 2);
        this.cy = Math.floor(this.c.height / 2);
        this.x2=this.cx;
        this.y2=this.cy;
    },
    reset: function() {
        this.setCenter();
        
        this.count = 0;
        
    },
    setPixelData: function() {
        this.imgData = this.ctx2getImageData(0, 0, this.c.width, this.c.height);
        this.pixelArr = this.imgData.data;
    },
    drawShadow: function() {
        // shadow
        this.ctx.fillStyle = "rgba("+75+","+75+","+75+","+.5+")";
        this.ctx.beginPath();
        this.ctx.arc(-2, -2, this.size, 0, this.PI2, true);
        this.ctx.closePath();
        this.ctx.fill();
    },
    drawColor: function() {
        this.ctx.fillStyle = "rgba("+this.newPixel.data[0]+","+this.newPixel.data[1]+","+this.newPixel.data[2]+","+this.newPixel.data[3]+")";
        this.ctx.beginPath();
        this.ctx.arc(0, 0, this.size, 0, this.PI2, true);
        this.ctx.closePath();
        this.ctx.fill();
    },
    drawPNG: function() {
        var random = Math.floor(Math.random()*100);
        if( random > 0 && random < 30 ) {
            this.ctx.drawImage(this.overlay, -this.size, -this.size, (this.size * 2), (this.size * 2));
        } else if (random > 30 && random < 60) {
            this.ctx.drawImage(this.overlay2, -this.size, -this.size, (this.size * 2), (this.size * 2));
        } else if (random > 60 && random < 100) {
            this.ctx.drawImage(this.overlay3, -this.size, -this.size, (this.size * 2), (this.size * 2));
        } else {
            this.ctx.drawImage(this.overlay, -this.size, -this.size, (this.size * 2), (this.size * 2));
        }
        
    },
    buttonize: function() {
        
        if(this.spiral) {
            this.ctx.drawImage(this.img, 0, 0);
            this.ctx2.drawImage(this.img, 0, 0);

            this.setCenter();
            
            var interval = setInterval(function() {
                var b = Buttonizer;
                
                if(b.on) {
                    b.angle = b.count/5;
                    b.radius = b.angle*2;
                    var x = b.cx+b.radius*Math.cos(b.angle);
                    var y = b.cy+b.radius*Math.sin(b.angle);

                    if(x > b.c.width) {
                        b.spiral = false;
                        b.reset();
                        b.buttonize();
                        clearInterval(interval);
                    }

                    b.newPixel = b.ctx2.getImageData(x, y, 1, 1);
                    b.ctx.save();
                    b.ctx.translate(x, y);
                    
                    if(Math.floor(Math.random()*100 > 20)) {
                        b.size =  Math.floor(Math.random()*5+(b.c.width / (.22*(b.c.width)))) * 2;
                        
                        // color layer
                        b.drawColor();
                        
                        // png
                        b.drawPNG();
                    }

                    b.ctx.moveTo(b.x2,b.y2);
                    b.ctx.restore();
                    b.x2=x;
                    b.y2=y;
                    b.count++
                } // if on
                
            }, 0);
        } else {
            setInterval(function() {
                    
                var b2 = Buttonizer;
                    
                if(b2.on == true) {
                    
                    for(var i = 0; i < 10; i++) {
                        var x = Math.floor(Math.random()*b2.c.width);
                        var y = Math.floor(Math.random()*b2.c.height);
                        
                        b2.radius = Math.floor(Math.random() * b2.size + b2.size);
                        var offset = Math.floor(Math.random()*10);
                        b2.newPixel = b2.ctx2.getImageData(x, y, 1, 1);
                        b2.size =  Math.floor(Math.random()*5+(b2.c.width / (.22*(b2.c.width)))) * 1.5;

                        b2.ctx.save();
                        b2.ctx.translate(x, y);
                        
                        // color
                        b2.drawColor();
                        
                        // png
                        b2.drawPNG();
                     
                        b2.ctx.restore();

                        b2.memory = [b2.newPixel.data[0], b2.newPixel.data[1], b2.newPixel.data[2], b2.newPixel.data[3]];

                        b2.count++;
                    }
                }
            }, 20);
        }
    } // end buttonize
} // end buttonizer

As always, if you need help with anything let me know and I’ll get back to you. @newshorts if you want to get in touch
 

web socket fun part 1

So I’ve been playing with websockets (because I’m a geek). I made this demo using socket.io to link an iPad’s movements to your desktop. It shows only the beginning of what’s possible with websockets. If anyone wants more of an explanation, feel free to contact me. I don’t think its worth putting up on github, but I’ll post the code below. Just visit the demo below on your phone and your desktop and watch the magic. Or better yet, call your friend in China and have him visit with his iphone and watch in real time as he moves his phone!

Demo

If you don’t know how to set up a server to run websockets – follow this tutorial.

Now that you have an environment set up with nodeJS and socket.io installed (npm install socket.io). Let’s make a server:

Create a new file called server.js in the www or public web directory and place the following code inside:

var app = require('http').createServer(handler)
  , io = require('socket.io').listen(app)
  , fs = require('fs')

app.listen(80);

function handler (req, res) {
  fs.readFile(__dirname + '/index.html',
  function (err, data) {
    if (err) {
      res.writeHead(500);
      return res.end('Error loading index.html');
    }

    res.writeHead(200);
    res.end(data);
  });
}

io.sockets.on('connection', function (socket) {

  socket.on('mobile', function(data) {
  	io.sockets.emit('desktop', { accelerometer: data });
  });

});

It loads in some libraries. Routes you to the correct index file. Then listens for an event called “mobile” and upon receipt of the data it just fires it straight back out to all the other socket connections.

Now we need a client script to handle all the events. Let’s create the index file where we will serve our js file to control websockets to the client.

Copy and paste:

<html>
	<head>
		<title>Accelerometer</title>
		<meta content="width=device-width,user-scalable=yes" name="viewport">
		<style>
			body {
				font-family: helvetica, arial, sans serif;
				background-color: black;
			}

			#content {
				width: 250px;
				margin: 0 auto;
				margin-top: 200px;
				position: relative;
				left: -75px;
			}
			/*#sphere {
				position: absolute;
				width: 50px;
				height: 50px;
				border-radius: 50px;
				-webkit-radius: 50px;
				background-color: blue;
			}*/

			img {
				/*-webkit-transition: -moz-transform 0.3s ease;
		        -moz-transition: -webkit-transform 0.3s ease;
		        -o-transition: -o-transform 0.3s ease;
		        transition: transform 0.3s ease;*/

		        -webkit-transition: all 0.2s ease;
		        -moz-transition: all 0.2s ease;
		        -o-transition: all 0.2s ease;
		        transition: all 0.2s ease;
			}

			/*
			-moz-transform: rotate(720deg);
	        -webkit-transform: rotate(720deg);
	        -o-transform: rotate(720deg);
	        -ms-transform: rotate(720deg);
	        transform: rotate(720deg);
			*/
		</style>
		<script type=text/javascript src="https://ajax.googleapis.com/ajax/libs/jquery/1.6.4/jquery.min.js"></script>
	</head>
	<body>
		<div id="content">
			<h1>Accelerometer Javascript Test</h1>
			<div id="imageHolder"></div>
		<div id="sphere" style="top: 0px; left: 0px;"></div>
		<script src="/socket.io/socket.io.js"></script>
        <script>
			// the bay citizen - map data
			// google data blog -
			socket = io.connect('http://107.20.254.40');
			/*socket.on('news', function (data) {
				console.log(data);
				socket.emit('my other event', { my: 'data' });
			});*/
        </script>
        <script>

			var appName = navigator.appCodeName;

			var isiPad = navigator.userAgent.match(/iPad/i) != null;
			var isiPhone = navigator.userAgent.match(/iPhone/i) != null;

			var x,
				y,
				agent = navigator.userAgent;

			var tilt = function(dataArr) {
				x = dataArr[0];
				y = dataArr[1];
			}

			if(isiPad || isiPhone) {
				if (window.DeviceOrientationEvent) {
				    window.addEventListener("deviceorientation", function () {
				        tilt([event.beta, event.gamma]);
				    }, true);
				} else if (window.DeviceMotionEvent) {
				    window.addEventListener('devicemotion', function () {
				        tilt([event.acceleration.x * 2, event.acceleration.y * 2]);
				    }, true);
				} else {
				    window.addEventListener("MozOrientation", function () {
				        tilt([orientation.x * 50, orientation.y * 50]);
				    }, true);
				}

				setInterval(function() {
					socket.emit('mobile', { x: x, y: y, agent: agent });
				}, 100);
			} else {
				console.debug(appName);

				$('#imageHolder').html('<img src="https://futurejesus.com/mobile-accelerometer/ipad.png" />');

				socket.on('desktop', function (data) {

					var xData = Math.round( parseFloat( data.accelerometer.x ) );

					// console.debug(xData);

					/*$('img').css({
						'-moz-transform': 'rotate(' + Math.round( parseFloat( data.accelerometer.x ) ) + 'deg)',
						'-webkit-transform': 'rotate(' + Math.round( parseFloat( data.accelerometer.x ) ) + 'deg)',
						'-o-transform': 'rotate(' + Math.round( parseFloat( data.accelerometer.x ) ) + 'deg)',
						'transform': 'rotate(' + Math.round( parseFloat( data.accelerometer.x ) ) + 'deg)'
					});*/

					$('img').css({
						'-moz-transform': 'rotate(' + xData + 'deg)',
						'-webkit-transform': 'rotate(' + xData + 'deg)',
						'-o-transform': 'rotate(' + xData + 'deg)',
						'transform': 'rotate(' + xData + 'deg)'
					});

				});

			}
		</script>
	</body>
</html>

This script detects if you’re on an iphone or ipad. If you are it sets you up to emit accelerometer data to the node server. If not, it sets you up to receive accelerometer data from the server.

The rest is just interpreting data and moving the ipad image according to tilt angle.

Have fun!

Make your weak ass node process strong like bull

Ok so your shit keeps shutting off. Every time you restart your server or echo anything to the terminal through STDOUT – your node process goes all to shit and you have to log on and get it running again…something like:

node server.js&

Well, screw that. We’re not going to take this shit any longer. On your ubuntu installation there’s something called upstart (unless you have some sort of weird ass installation). We are going to make your node process run, even if your entire server suddenly bursts into flames and the sys admin decides water is the best solution…

Change directories to:

cd /etc/init

Then make a new file:

sudo pico accelerometer.conf

It just has to be “.conf”. Ok now paste the following in and change the path to your node file:

description "node.js server"
author      "kvz - http://kevin.vanzonneveld.net"

# used to be: start on startup
# until we found some mounts weren't ready yet while booting:
start on started mountall
stop on shutdown

# Automatically Respawn:
respawn
respawn limit 99 5

script
    # Not sure why $HOME is needed, but we found that it is:
    export HOME="/root"

    exec /usr/bin/node /home/ubuntu/www/accelerometer/accelerometer.js >> /var/log/node.log 2>&1
end script

post-start script
   # Optionally put a script here that will notifiy you node has (re)started
   # /root/bin/hoptoad.sh "node.js has started!"
end script

I didn’t write the previous, this guy did but he seems really smart, so don’t f*** with it.

now run the shit:

sudo start accelerometer

That’s it. Should be up and running like a hamster in one of those wheels that we think are so fun, but are actually a hamster’s version of the ho chi minh.

How to ssh to your goddamned ec2 instance

I hope the title conveys my frustration at recent events surrounding ssh access to your ec2 instance. Amazon recently changed their interface, and doesn’t allow you to create 506 certificates from the admin panel anymore. Now you must create the private key when you create a new instance. So it’s actually more streamlined but damn confusing for those of us used to the “old way.” So here it goes…

When you create your goddamn new ec2 instance amazon will ask you to set an existing key pair or create a new piece of shit key ass pair. Just create a new goddamned key pair. When you do, download the effing pem file to your ~/.ssh fracking folder.

Now enter the following shitty ass command:

ssh -i ~/.ssh/YOUR_KEYPAIR_FILE.pem ec2-user@YOUR_IP_ADDRESS

You will probably get some goddamned error saying the permissions are shitty and you have to change them.

Change that shit to the following:

sudo chmod 600 ~/.ssh/YOUR_KEYPAIR_FILE.pem

Now enter in that stupid ass ssh command again:

ssh -i ~/.ssh/YOUR_KEYPAIR_FILE.pem ec2-user@YOUR_IP_ADDRESS

And get your shit all set up once you finally have goddamned access to your own stupid ass fricking instance.

It was refreshing to curse during the making of this article…I think in the future I will vent like this…

Positioning pages within iframes

Let’s say I don’t want the whole page of an iframe. Let’s say I just want to grab the news box of Yahoo’s page…

There’s a great tutorial here.

You just want to trick the browser into only showing a window of the iframe and then loading the whole page behind the window. So the user only sees through the window at exactly what you want them to look at.

Below you can see the news section of yahoo:

And here’s the code:
<style>
#outerdiv
{
width:446px;
height:246px;
overflow:hidden;
position:relative;
}

#inneriframe
{
position:absolute;
top:-412px;
left:-318px;
width:1280px;
height:1200px;
}
</style>
<div id='outerdiv '>
<iframe src="https://www.yahoo.com/" id='inneriframe' scrolling=no >< /iframe>
</div>

It doesn’t work on every browser, but webkit and gecko work as usual.

Getting Started with the Google Closure Library

Let’s start using the google closure library shall we? First we need to install it…

First, install the closure library:

First lets install the closure library, this will allow us to use some of the tools the library includes. This method uses svn to install to whichever directory you call it from. If you don’t have SVN and you’re using a mac go here and install it. Once you have it installed, navigate to the directory of your choosing and checkout the latest closure library from google:

cd ~/Desktop
svn checkout http://closure-library.googlecode.com/svn/trunk/ closure-library

This will install the closure library on your Desktop, or choose a more specific directory and call svn from there.

Create a file on your desktop named hello.js:

// calls google dom script
goog.require('goog.dom');

// runs after the page load
function sayHi() {
  var newHeader = goog.dom.createDom('h1', {'style': 'background-color:#EEE'},
    'Hello world!');
  goog.dom.appendChild(document.body, newHeader);
}

Now create the html file which will call the closure library and the rest is history:

<!DOCTYPE html>
<html>
    <head>
        <title>Hello World</title>
        <meta http-equiv="Content-Type" content="text/html; charset=UTF-8">
        <script src="closure-library/closure/goog/base.js"></script>
        <script src="hello.js"></script>
    </head>
    <body onload="sayHi()">
        <div id="wrap">
            
        </div>
    </body>
</html>

This calls in a script called base.js, which sets the google closure library up to calculate some dependencies and load in the right javascript files. If you load the page in a browser and inspect the file you will see that base.js has calculated some dependencies and included more scripts to make your “sayHi()” function possible. However, that’s one hell of a lot of GET requests for such a simple site. Let’s compile this.

Luckily, the closure library does this as well. The process is simple:

  1. Write your scripts, include base.js and test until you’re ready to compile your javascript.
  2. When you’re ready, download the closure-compiler .jar file and place it in a directory labeled “closure-compiler” next to the “closure-library” directory.
  3. Then execute a simple command in your terminal (I’m on a mac) and let the closure library do the work for you!

Once we have downloaded the closure-compiler .jar file, let’s place it in a directory named “closure-compiler” next to our “closure-library” on our Desktop.

Let’s run the command:

closure-library/closure/bin/calcdeps.py -i hello.js 
  -p closure-library -o compiled 
  -c closure-compiler/compiler.jar > hello-compiled.js

You should get a return file named “hello-compiled.js” and if you look inside all the javascript you need has been reduced to compiled javascript.

Next let’s change out html file to include this compiled version:

<!DOCTYPE html>
<html>
    <head>
        <title>Hello World</title>
        <meta http-equiv="Content-Type" content="text/html; charset=UTF-8">
        <script src="hello-compiled_v3.js"></script>
    </head>
    <body onload="sayHi()">
        <div id="wrap">
            
        </div>
    </body>
</html>

That’s it! All the commands we’re issued from ~/Desktop in terminal on a Mac. “hello.js” and “hello.html” were both saved to the desktop as well as the two directories “closure-library” and “closure-compiler”.


Adding a Virtual Host (vhost) in XAMPP on a Mac

Recently, I had to set my other mac up with a local dev environment and found it hard to find the correct files to edit on a mac with XAMPP. I want to set up an environment where I can hit localhost.com and get served XAMPP files. So here goes:

Edit your hosts on mac 10.6:

In /etc/hosts – add the following line to the end of the file:

127.0.0.1   localhost.com

Edit your XAMPP vhosts file:

In /Applications/XAMPP/xamppfiles/etc/extra/httpd-vhosts.conf add the following to the end of the file:

<VirtualHost *:80>
        DocumentRoot "/Applications/XAMPP/xamppfiles/htdocs"
        ServerName localhost.com
</VirtualHost>

Finally, edit your XAMPP apache config file:

In /Applications/XAMPP/xamppfiles/etc/httpd.conf uncomment the following line:

# Virtual hosts
Include /Applications/XAMPP/etc/extra/httpd-vhosts.conf

Now stop apache, restart XAMPP and you should be able to visit:

http://localhost.com/PATH_TO_YOUR_LOCAL_SITE