Google+ API Released

Google released their API today…which means fun for everyone. I’m thinking a visualization of the globe chrome experiment with a real time (or near real time) update of public statuses. Hopefully, these little spikes will animate in as public statuses are read and then disappear. Should be fairly freaking badass.

A rundown on the API:

  • You need an API key to get restful access…
  • API comes true to form,RESTful HTTP with a JSON return…
  • API Client Libraries including, Java, Python, Ruby and PHP
  • Uses OAuth for all secure requests
  • Throttled at 1,000,000 queries / day / user
  • Most returns are defaulted to a max of 20 data objects
  • You can filter responses using the “fields” query (pared down response):
https://www.googleapis.com/plus/v1/activities/z12gtjhq3qn2xxl2o224exwiqruvtda0i?fields=url,object(content,attachments/url)&key=YOUR-API-KEY

A Brief example…

Let’s say I just want to get the last 20 “status” updates from a person on google+. Let’s also say I’m starting from scratch. I simply make a GET request to:

https://www.googleapis.com/plus/v1/people/{USER_ID}?pp=1&key={YOUR_API_KEY}

NOTE: If you get a “not found” message from google using the above URL, don’t despair…just update your API key and use a new one, everything should work swimmingly.

Where the USER_ID is the id of the user you are looking for and the API_KEY is your API Key you registered with your google profile. If you don’t know where to find the id of the user you’re looking for, simply visit his/her profile on g+ and grab it from the URL (as shown below).

Next:

In the next article, we’ll download the client library and begin doing something interesting with this information…


NodeJS, Websockets and EC2

I’m working on a project that involves websockets and needed to set up a test server. If you are looking for a server to do nothing but websockets and run node.js than this is you’re tutorial.

We’ll be setting our environment up on EC2, our stack will consist of node.js running on port 80 (requires root) and some software we might need.

Let’s set up the environment first.

Launch the following instance:

ebs/ubuntu-images/ubuntu-maverick-10.10-i386-server-20101225 (ami-ccf405a5)

We don’t care where its location and have no preferences on security groups or anything. NOTE: This environment is not intended for production, there will be many security holes with our setup, but if your looking to get something up and running for prototyping…this is super quick.

UPDATE: if you are having trouble “sshing” to this shitty server, follow the tutorial here.

SSH and do:

ssh ubuntu@YOUR_INSTANCE_IP -p22
sudo apt-get update

Then:

sudo apt-get -y upgrade

Let’s get rcconf – we won’t use it, but it might be helpful to you later on…

sudo apt-get install rcconf

Now let’s install some essential packages:

sudo apt-get install build-essential
sudo apt-get install libssl-dev
sudo apt-get install git-core

At the time of writing this, the current version of node (0.5.5) has a problem with the most recent version of npm – so we’ll install a good stable version of node (0.4.10). This way we know we’re getting something that works. Install node:

wget http://nodejs.org/dist/node-v0.4.10.tar.gz
tar xzf node-v0.4.10.tar.gz
cd node-v0.4.10
./configure --prefix=/usr
make
sudo make install

Now let’s install npm:

cd ~
git clone http://github.com/isaacs/npm.git
cd npm
sudo make install

Now for the fun stuff. Let’s get some cool packages from npm:

cd ~
npm install connect redis connect-redis jade express express-resource futures emailjs socket.io http-proxy

Let’s make a web folder:

cd ~
mkdir ~/www
cd ~/www
pico server.js

Enter the following into server.js:

var http = require('http');
http.createServer(function (req, res) {
  res.writeHead(200, {'Content-Type': 'text/plain'});
  res.end('Hello Worldn');
}).listen(80);
console.log('Server running at http://127.0.0.1:80/');

Run the node server and visit your instance’s IP address:

cd ~/www
sudo node server.js

You should see a “hello world” appear at the top of the page. This indicates your node server is running properly. Now its time for use to configure our server a bit more test our web sockets. Let’s make sure web sockets are running before we do anything else.

Now let’s stop the node server for a second so we can do some more work. Hit “Ctrl + c” to kill the process.

Create “index.html”:

pico ~/www/index.html

And fill it with (remember to replace YOUR_IP_ADDRESS with your instance’s IP):

<html>
	<head>
		<title>Node</title>
	</head>
	<body>
		<script src="/socket.io/socket.io.js"></script>
		<script>
		  var socket = io.connect('http://YOUR_IP_ADDRESS');
		  socket.on('news', function (data) {
		    console.log(data);
		    socket.emit('my other event', { my: 'data', another: 'more data' });
		  });
		</script>
	</body>
</html>

Now open server.js:

pico ~/www/server.js

And replace the contents with a websocket server:

var app = require('http').createServer(handler)
  , io = require('socket.io').listen(app)
  , fs = require('fs')

app.listen(80);

function handler (req, res) {
  fs.readFile(__dirname + '/index.html',
  function (err, data) {
    if (err) {
      res.writeHead(500);
      return res.end('Error loading index.html');
    }

    res.writeHead(200);
    res.end(data);
  });
}

io.sockets.on('connection', function (socket) {
  socket.emit('news', { hello: 'world' });
  socket.on('my other event', function (data) {
    console.log(data);
  });
});

Now let’s test it:

cd ~/www
sudo node server.js

And visit the IP of your instance in a web browser. Nothing should appear on the screen, but if you look in your terminal you should see data being transferred. Additionally, if you inspect the element (chrome or Firefox) and refresh the page, data should appear in the “console” tab.

Great, now that we have websockets working, let’s get FTP up and running so we can start to make some changes. Kill the node server again by running “Ctrl + c”.

Let’s install vsftpd, which is the most popular FTP server on Linux:

sudo apt-get install vsftpd

Now we need to edit the configuration file to get it running:

sudo pico /etc/vsftpd.conf

Add the following lines to the end of the file:

pasv_enable=YES
pasv_min_port=1024
pasv_max_port=1048
pasv_address=107.20.254.40

Make sure in your security group for the instance that you have opened ports 21, 22 and 80 for FTP, SSH and HTTP respectively.

Also make sure you enable the following line:

# Uncomment this to enable any form of FTP write command.
write_enable=YES

Now we can restart vsftpd:

sudo service vsftpd restart

However, we haven’t set up any sort of password for our user yet. We should be running all our commands under the default “ubuntu” user. That’s ok, lets just set a password for root and for our friend Ubuntu:

sudo passwd

Then enter in your new password for root. Then set the password for “ubuntu”:

sudo passwd ubuntu

And enter Ubuntu’s password.

We should now be able to FTP to our instance at ftp://YOUR_INSTANCE_IP/ with the username “ubuntu” and the password you just set.

To recap, in about 15 minutes (not counting the time it takes to make and install node and npm) we have set up a shiny new Amazon instance, installed node and enabled web sockets. Set up FTP service and have access to change files.

References: Installing FTP on EC2, Socket.io getting started, inspiration for this article, there also a great post here.

Congratulations!

UPDATE: If you don’t want to go to the trouble of setting up a server environment to run node, you could just use this: http://jsapp.us/

Using Wireshark to Audit Your Network

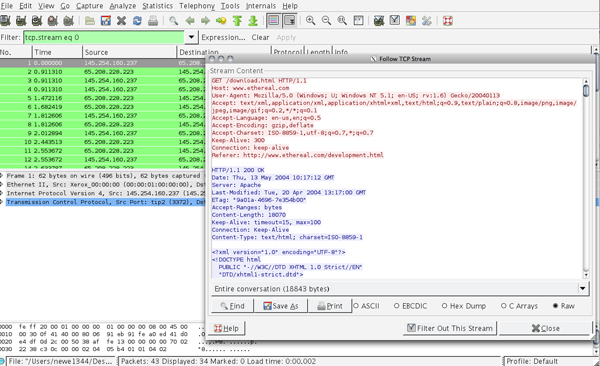
I was talking with a friend about “listening” in on other peoples wireless connections. He didn’t realize how easy it is for someone to audit an open network and begin tracking online activity. Like most things mischievous online, the barrier to entry is an indicator of how likely an attack is. Take WEP cracking for example, all you need is a packet capture program and rainbow tables and you’re in. Most of the hard work is done for you. However, listening in on networked conversations is even easier, which means, potentially more people are doing it.

Here’s how:

  1. Download Wireshark.
  2. Install and start a packet capture.
  3. Right click and follow a TCP stream.

That’s it. You’ll literally be able to read anything over your network in plain text as long as the connection is not through https and the wireless network is not encrypted.

It gets more complicated if you want it to be. I’m sure everyone is well aware, but I’ll reiterate, one should never use Wireshark to audit a network that one doesn’t have permission to audit. However, bad apples do exist, so if you have an unsecured wireless network, consider it public and never login to important sites while on it.

Linking to certain time in YouTube Videos

It’s simple really. If you want to send your friend a youtube video and have it start playing at a certain time into the video. YouTube has a link for that…

Just copy the YouTube URI as usual, and append:

&t=1m24s

to the end of it (where “1m42s” is the time you want your video to start playing at).

So the whole URL would look something like this:

http://www.youtube.com/watch?v=Bqxnm6t3QMw&t=0m42s

Just an example, don’t judge me.

Firefox Search URL Bar

I use chrome for most things now, because of one feature…the url bar will do google searches if it doesn’t recognize a domain. This feature is so crucial to the ease of my internet surfing that I’ve switched from my favorite browser (Firefox). Now I need two browsers whilst I’m working becuase chrome is vastly superior for surfing but Firebug on Firefox outdoes anything chrome has put up.

So where’s a middle ground?

Type this in your URL bar (Firefox)…

about:config

Click through the warning and filter for…

keyword.URL

Double click and enter…

http://www.google.com/search?ie=UTF-8&sourceid=navclient&q=

That should take care of that! Now you can use Firefox to do your searching, even if you didn’t type you search in that dumb side search field.

Although, if you don’t want to deal with any of that, there is a wonderful plugin called “Omnibar” which will do all that and more fore you.

Thank god or…whatever.

Dynamically change your LEDs with Trigonometry

I’m working on a prototype for what I’m calling the Bullshit Ball. To be fair, this was an idea stemming from our recent Making Digital Work Conference where Edward Boches suggested a box be present in meeting rooms that could relay whether members in the room thought the person speaking was full of shit or not.

I decided this was a noble enough idea to spend a week trying to build. I’m not finished with it yet, but as part of the invention requires a glowing ball with different hues of light, I’ve come up with an interesting way to control Tri-color LEDs with a little high school trigonometry…

Tri-color LEDs operate with one ground wire and three different leads for (blue, red and green).

The objective is then to create some sort of fade-in / fade-out situation where as once color is fading out, another color is fading in. This will create different hues and provide a relatively seamless transition between one color and the next. I was experimenting with ways to increment one color whilst decrementing another when it dawned on me that all I need were some wave forms. I turned to trig 101 for the answer.

Basically, the equation goes something like this:

  1. Set the amplitude or “height above zero” to 255 to represent the values of PWM on an arduino.
  2. If I want blue to be the center value, then take the sin of the value for blue.
  3. Divide the value of blue by 1/2 since we only want one half of a wave.

And you end up with a wave like this:

Green:

Green:

NOTE: I use percentages in the code example because I’m making this LED behavior for the bullshit ball, which will return a percentage of votes.

Hardwiring…

And…

Now for some code…

/*

AUTHOR: Michael Newell
SITE: https://iwearshorts.com/

Based on the original FADE sketch under the Basics tab of default arduino sketches. 

No License, feel free to do whatever you want with this.

This sketch articulates how to fade different hues of a tri-color LED in and out continuously.

*/

float fadeAmount = 0.01;    // how many points to fade the LED by
float percentage = 0.98;    // where to start

void setup()  {
  Serial.begin(9600);
  // declare pin 9 to be an output:
  pinMode(9, OUTPUT);
  pinMode(10, OUTPUT);
  pinMode(11, OUTPUT);

} 

void loop()  { 

  // change the percentage for next time through the loop:
  percentage = percentage + fadeAmount;

  analogWrite(9, setPin9(percentage)); // red
  analogWrite(10, setPin10(percentage)); // blue
  analogWrite(11, setPin11(percentage)); // green

  // reverse the direction of the fading at the ends of the fade:
  if(int(percentage*100) == 1.00) {
    Serial.println("changed to a negative fadeAmount");
    Serial.println(fadeAmount);
    fadeAmount = -fadeAmount;
  }

  if(int(percentage*100) == 99.00) {
    Serial.println("changed to a negative fadeAmount");
    Serial.println(fadeAmount);
    fadeAmount = -fadeAmount;
  }

  // wait for 30 milliseconds to see the dimming effect
  delay(300);
}

int setPin9 (float percent) {
  if(int(percent*100) < 49.00 && int(percent*100) > 1.00) {
    return 255 * cos( .5 * (PI * (percent * 2) ) );
  } else {
    return 0;
  }
}

int setPin10 (float percent) {
  return 255 * sin( .5 * (TWO_PI * percent) );
}

int setPin11 (float percent) {
  if(int(percent*100) > 50.00 && int(percent*100) < 99.00) {
    return 255 * sin( .5 * (PI * (2 * (percent - .5) ) ) );
  } else {
    return 0;
  }
}

You can also check out the source on Github.

Escape from Telnet

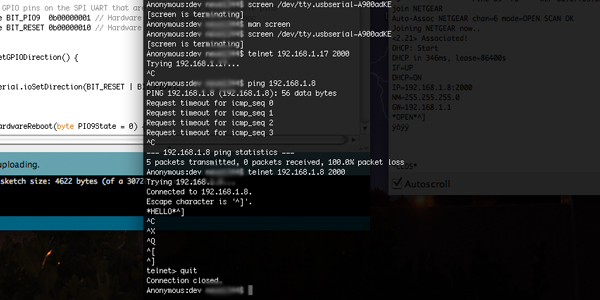
It took me a good 30 minutes last night to figure out how to escape from a telnet connection. I’m man enough to admit it, the instructions even specifically state how to escape when you make the connection. Here’s to blindly ignoring instructions!

For anyone else out there whose having trouble escaping, you just enter ^] (control + ] for anyone on a mac).

telnet 192.168.1.17 2000

# open connection #

^]

# closed connection #

Screenshot of what I’m talking about below.

Resize Your Images with Sencha.io

Sencha.io is a project started by Sencha labs to provide quality photos resized automatically for mobile platforms. It works by calling the site in your CSS stylesheets with an image URI and it detects the client platform automatically. In other words, you could have an oversized image for your regular users. When a mobile user hits the site, you can automatically resize that image according to the mobile platform, with no extra coding from you!

Sencha.io Syntax:

.oh-hai {
            background: #000 url(https://src.sencha.io/http://www.skinet.com/skiing/files/imagecache/gallery_image/_images/201107/windells_hood.jpg) no-repeat;
            color: #fff;
            height: 100px;
            font-family: 'HelveticaNeue-UltraLight', 'Helvetica Neue UltraLight', 'Helvetica Neue', Arial, Helvetica, sans-serif;
        }

You can see in the image URL, there’s a call to “http://src.sencha.io/” and then you pass it the image you want to resize. This allows you to rapidly develop mobile versions of your site that work cross-platform.

There’s an older version of this that may be familiar to some, called tinysrc. This service was the earlier version of sencha.io and it’s now recommended that users switch to using the new API. The syntax for resizing images remains exactly the same and Sencha has no intention of removing tinysrc for the foreseeable future.

Tinysrc Syntax:

.oh-hai {
            background: #000 url(https://i.tinysrc.mobi/http://www.skinet.com/skiing/files/imagecache/gallery_image/_images/201107/windells_hood.jpg) no-repeat;
            color: #fff;
            height: 100px;
            font-family: 'HelveticaNeue-UltraLight', 'Helvetica Neue UltraLight', 'Helvetica Neue', Arial, Helvetica, sans-serif;
        }


Hide your Torrents with hid.im

Lately, many people have been having trouble sharing torrent files (of questionable nature) around the web. Public torrent trackers are less safe. So here’s a safer way to share torrents, hid.im. Basically, hid.im encodes torrents into .png files which you can upload to any image sharing service. Once a user downloads the .png they can decode it with hid.im’s decoder.

However, it can’t be searched so it won’t turn up in any searches unless you include some plain text with your uploads.

hid.im

Type Detecting Function in Javascript

Here’s a simple function that detects the type of argument passed to it. Works great for overloading functions. It could probably be made more efficient but for the sake of showing how it works I intentionally made it verbose.

<script type="text/javascript">
          function detectType(random) {
              
              var output;
              
              switch(random.constructor) {
                  case Array : 
                      output = "Array ";
                      break;
                      
                  case Object : 
                      output = "Object ";
                      break;
                    
                  case Function : 
                      output = "Function ";
                      break;
                      
                  case String : 
                      output = "String";
                      break;
                      
                  case Number : 
                      output = "Number";
                      break;
                      
                  case Boolean :
                      output = "Boolean";
                      break;
                      
                  case User :
                      output = "User";
                      break;
                      
                  default : 
                      output = "Unable to determine type";
                      
              }


              console.debug("The type of argument is: " + output);
          }
          
          detectType("only one argument");
          
          detectType(43);
          
          detectType({
             something: "else" 
          });
          
          detectType(function () {
              var stuff = 42 + 5;
          })
          
      </script>

Simple. It uses the “constructor” property to detect the type.