EC2 Instance with Ubuntu, Node, Nginx and MongoDB

The future is here. Tis Javascript ladies and gents. I got into it after my teach Jones started showing my how capable it is. It fits the bill for all things modern including scalable performance from a high powered database, web sockets, and serverside javascript in the form of NodeJS.

Let’s get it all set up!

  1. Follow the tutorial here: http://www.robertsosinski.com/2008/01/26/starting-amazon-ec2-with-mac-os-x/ and here if you can’t connect via ssh: http://paulstamatiou.com/how-to-getting-started-with-amazon-ec2
  2. Then here: http://cuppster.com/2011/05/12/diy-node-js-server-on-amazon-ec2
  3. Finally, install Mongo here: http://brilliantcorners.org/2010/12/a-better-way-to-install-mongodb/

If you can’t figure it out, give me a shout and I’ll make a little installation video.

Also, you might run into trouble on the step where your supposed to curl the supervisor script, don’t worry, git is just redirecting you. Just go to the URI and copy + paste the script into the file the curl command created and you’re all good.

curl https://gist.github.com/raw/176149/88d0d68c4af22a7474ad1d011659ea2d27e35b8d/supervisord.sh > supervisord

That’s it!

Add Closure to your SetTimeout

Had a quick problem with getting my setTimout() function to run. I will usually run the function like w3schools recommends:

function hello () {
   alert("Hello World");
}

setTimeout("hello", 5000);

However, I couldn’t get it to run with a jQuery .get script inside the function. However, when I tried an alternate syntax called “closure”:

setTimeout(function () {
   alert("Hello World");
}, 5000);

It worked straight away. Just food for thought, plus it makes your code alot easier to read.

Everyday git commands

After updating or creating a file:

You’v created a file and want to update the repo.

git add filename.txt

Then commit the change:

git commit -m "This is a message you can post with the commit"

Now git knows that you want this change to update the git repo, but it still hasn’t pushed the change to git yet. It’s only local, to push it to git:

git push -u origin master

To start a new branch:

One thing that isn’t immediately clear to newcomers to git is the fact that you can track multiple branches in one directory on your server or local development environment. For instance, let’s say I have a site with two branches. I have a master branch (this is a production branch meaning I can take any instance of that branch and upload it to my server and expect it to work). Then I have a “develop” branch (this is the branch where I have all my ongoing local development going on). However, this doesn’t mean I need to have two separate directories that contain two different versions of my site. The beauty of git, is it allows you to tack changes made on different branches simply by switching from one to the other and working from the same local directory. I can merge changes to a master branch, upload the updated site to my server, expect it to run and then switch back to my development branch and start pushing updates immediately.

Let’s say we have a master branch and we want to start a development branch to work on, then we’ll merge with our “master” after we’re sure it’s production ready. First we create the branch:

git branch develop

Now we have a branch called “develop”, let’s check it out by typing:

git branch

We can see our return we get “*master” and “develop”, which means we’re still working on our master branch. To switch over, let’s type:

git checkout develop

Now we can commit our changes and switch back to the master:

git commit -a

If I want to push those changes to be store on the git servers for the development branch I could push them the same way I would push for the master branch:

git push origin develop

Now we can switch back to master:

git checkout master

Useful tips:

If at any point you wish to see some information in the command line about your history. You can view the log file:

git log

To get the status of a directory and see if you need to push any updates:

git status

When starting a new repo, make sure you create the directory locally and run:

git init

To add all the updates and get them ready for commit:

git add --all

Timellax Theme for WordPress

I started a new timeline theme for wordpress called “Timellax.” It’s just a parallax based theme that allows a user to post to a timeline easily. It allows users to create text posts, image posts, image posts with text tooltips and adjust their posts based on “year.”

You can check out the original site from which the theme was based here, and check out my new fancy git repo here.

If you’d like to contribute, let me know!

Adding Effects to your Images with Canvas

You can add various effects to your images by placing them in a canvas element and adjusting the image pixel by pixel. I cam up with a couple different patterns simply by altering the opacity of the image in different places. First off there is a great tutorial over here, if you are new to the canvas element. I’ll recap:

Canvas Basics…

  1. Find the canvas element on the page
  2. Get the context of the element
  3. Get the image you will be loading into canvas
  4. Display the image on the canvas
// get the canvas
var mikeCodeCanvas = document.getElementById("mike-code-canvas");

// get the context
var mikeCodeContext = mikeCodeCanvas.getContext("2d");

// get the image
var mikeCodeImage = document.getElementById("mike-code-img"); 

// draw the image
mikeCodeContext.drawImage(mikeCodeImage, 0, 0);

More advanced…

  1. Get the image data
  2. Alter the image data
  3. Display the new data
// get the image data
var mikeCodeImgData = mikeCodeContext.getImageData(0, 0, 485, 223);

// manipulate the image data
var mikeCodePix = mikeCodeImgData.data;

for (var i = 0, n = mikeCodePix.length; i < n; i += 4) {
   mikeCodePix[i] = color; 	// red
   mikeCodePix[i + 1] = color; 	// green
   mikeCodePix[i + 2] = color; 	// blue
   // mikeCodePix[i + 3] = color; // alpha
}

// write the new data to the image
mikeCodeContext.putImageData(mikeCodeImgData, 0, 0);

Now that we have the basics its time to start altering our image data. A simple way to do this is to take the negative of the image. Simply replace the code inside the “for loop” with this and you will end up with a negative of the original image.

mikeCodePix[i] = 255 - mikeCodePix[i];
mikeCodePix[i + 1] = 255 - mikeCodePix[i + 1];
mikeCodePix[i + 2] = 255 - mikeCodePix[i + 2];

It takes the maximum possible value in RGBa colors and subtracts the value it was currently at, reversing the color.

Next clear the orginial and write the data to the canvas again.

mikeCodeContext.clearRect(0, 0, mikeCodeCanvas.width, mikeCodeCanvas.height);
mikeCodeContext.putImageData(mikeCodeImgData, 0, 0);

You should see the image negative pop up.

Patterns…

So far we haven’t dealt with the alpha value much. Basically, the way the canvas pixel array work is it stores all pixel color information in a single array. It stores for values for every pixel (red, green, blue and alpha). That means you must travers every other set of 4 pixels in your for loop. It also means in the example above that alpha would be located at:

mikeCodePix[i + 3] = color;

So we can play around with the alpha values in our for loop as well. It also means we can skip over pixels and give them random values if we want. So lets try it out, lets give the alpha value a random number. Try this…

mikeCodePix[i + 3] = Math.floor(Math.random()*256);

This will loop through all the pixels and randomly assign an opacity to each pixel in the image. This makes it look like a bunch of noise on the image. From here you can check out the code and see what other patterns I’m giving the images.

function changePattern(pattern) {
			
			pattern = pattern || "jeans";


			var mikeCodeCanvas = document.getElementById("mike-code-canvas");
			
			// remember to reset the canvas before placing a new effect on the image
			mikeCodeCanvas.width = mikeCodeCanvas.width;
			
			var mikeCodeContext = mikeCodeCanvas.getContext("2d");
			
			var mikeCodeImage = document.getElementById("mike-code-img");
						
			// draw the image
			mikeCodeContext.drawImage(mikeCodeImage, 0, 0);
			
			var mikeCodeImgData = mikeCodeContext.getImageData(0, 0, 485, 223);
			
			var mikeCodePix = mikeCodeImgData.data;
			
			for (var i = 0, n = mikeCodePix.length; i < n; i += 4) {
				var color = 255;
				
				if(mikeCodePix[i] > 0) {
					color = 0;
				}
				
				/*
mikeCodePix[i] = color; 	// red
				mikeCodePix[i+1] = color; 	// green
				mikeCodePix[i+2] = color; 	// blue
				
*/
				mikeCodePix[i] = 255 - mikeCodePix[i];
				mikeCodePix[i + 1] = 255 - mikeCodePix[i + 1];
				mikeCodePix[i + 2] = 255 - mikeCodePix[i + 2];
				// jeans
				if(pattern == "jeans") {
					mikeCodePix[i * 4 + 3] = Math.floor(Math.random()*256);					
				}

				
				// stripes
				if(pattern == "stripes") {
					mikeCodePix[i * 4 + 3] = 90;
				}
				//
				
				// noise
				if(pattern == "noise") {
					mikeCodePix[i * Math.floor(Math.random()*4) + 3] = Math.floor(Math.random()*256);
				}
				//
				
				// dots
				if(pattern == "dots") {
					mikeCodePix[i * 2 + 3] = 90;
				}
				//
				
				// straight opacity
				if(pattern == "opacity") {
					mikeCodePix[i + 3] = 90;
				}
				
				if(pattern == "random") {
					mikeCodePix[i + 3] = Math.floor(Math.random()*256);
				}
			}
			
			mikeCodeContext.clearRect(0, 0, mikeCodeCanvas.width, mikeCodeCanvas.height);
			mikeCodeContext.putImageData(mikeCodeImgData, 0, 0);
			console.debug("end");
		}
	
	
		$(document).ready(function () {
		
			$("li").click(function (event) {
				//console.debug($(event.currentTarget.childNodes).data().pattern);
				//console.dir($(event.currentTarget).find("a").data());
				
				if($(event.currentTarget).find("a").data().pattern) {
					var pattern = $(event.currentTarget).find("a").data().pattern
					changePattern(pattern);
				}
				
				if($(event.currentTarget).find("a").data().color) {
					var color = $(event.currentTarget).find("a").data().color;
					
					$("body").css({"background-color" : color});
					if(color == "white") {
						color = "black";
					} else {
						color = "white";
					}
					$("a").data("color", color);
				}

			});
		});
		
		$(window).load(function () {
			changePattern("jeans");
		});

On document read we listen for a click even on one of the pattern links, if we find one, we search through html5’s new data attribute until we find the right pattern and pass the value to the function “changePattern()”. This function takes a pattern finds all the canvas elements, reset’s the canvas and loops through the pixels according to the pattern it was passed. Then we print out the image. On window.load we set the default pattern to “jeans”.
Demo

Download

HTML5 Video doesn’t work in Firefox

If you ever run into a problem where your html5 video doesn’t work in Firefox but works in Chrome when loading the video from Amazon S3, make sure you are sending the correct MIME types in your headers. I just ran into this issue so I thought I’d post it…

Often times Amazon just slaps an “application/octet-stream” mime type onto different video formats. Let’s say you have the following code:

<video autoplay="autoplay">
		<source src="https://s3.amazonaws.com/iwearshorts-video/mike-student-site.ogv" type='video/ogg; codecs="theora, vorbis"'>
		<source src="https://s3.amazonaws.com/iwearshorts-video/mike-student-site.mp4" type='video/mp4; codecs="avc1.42E01E, mp4a.40"'>
		<p>Your browser doesn't support video. Please download the video in <a href=leverage-a-synergy.ogv>Ogg</a> or <a href=leverage-a-synergy.mp4>mp4</a> format.</p>
	</video>

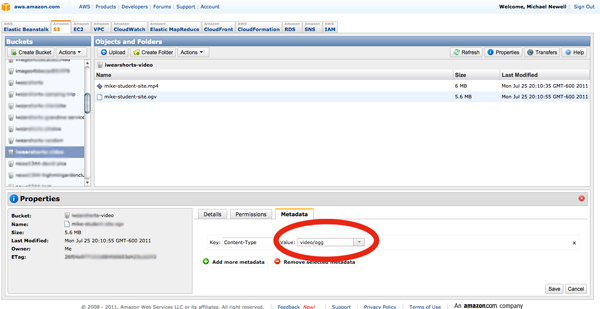
And it works in Chrome but not Firefox. Inspect the element in Firebug, and look at the “Net” tab. Make sure the header for the video says “video/ogg” or “video/mp4” somewhere in the header. If it doesn’t, you may need to edit the meta data in your aws.amazon.com console.

Simply edit here:

Amazon will now send out the proper mime types for your content. Firefox and Chrome will now have the ability to view your html5 video tag!

For more information go here.

Converting MP4 to OGV on Mac

UPDATE: As of May 13th, 2012 I use something “MiroConverter” to do this for me. It’s has an easy to use GUI and ends up using FFMpeg anyway…

Get MiroConverter.

I use something called ffmpeg2theora. It works like a charm, the only downside is there is no GUI, so you have to do everything from the command line. However, as other video encoders are unreliable and unstable this thing just works!

One should always use a couple different video sources for the html5 video tag, like:

<video>
    <source src="example-video.mp4" type="video/mp4" />
    <source src="example-video.ogv" type="video/ogg" />
</video>

For browser compatability reasons. In fact, if you use the two formats below you will cover 99% of the new browser compatibility issues out there.

Installation

To use it, simply go here, download the right version of the softaware and unzip the package, it comes in a convenient installer so follow the instructions after opening.

Usage

It’s so simple to use, simple open up your terminal and type:

ffmpeg2theora video.m4v

And it will transcode the video automatically and place new file in the same folder as the .mp4 version.

Super simple.

There’s also a great discussion of the different video transcoding software out there here.

Javscript Browser Detection

For all those interested, W3schools has a simple yet great script for javascript browser/client detection. It goes something like this:

<script type="text/javascript">

txt = "<p>Browser CodeName: " + navigator.appCodeName + "</p>";
txt+= "<p>Browser Name: " + navigator.appName + "</p>";
txt+= "<p>Browser Version: " + navigator.appVersion + "</p>";
txt+= "<p>Cookies Enabled: " + navigator.cookieEnabled + "</p>";
txt+= "<p>Platform: " + navigator.platform + "</p>";
txt+= "<p>User-agent header: " + navigator.userAgent + "</p>";

document.getElementById("example").innerHTML=txt;

</script>

That’s it, short and sweet.

Grab the real width of elements with jQuery

This one took me about an hour to figure out so here goes…

Explanation…

Images don’t load into jQuery’s $(document).ready() function so you have to wait for the window to load. Then jQuery can get the image dimensions.

Wrong…

	$(document).ready(function() {
		var imageWidth = $("#image").width();
	});

Right…

$(window).load(function() {
		var imageWidth = $("#image").width();
	});

The difference is jQuery executing before the browser has time to load the images, so there’s dimensional information on images available. However, if you wait for the window to load, all the information you need becomes available.


Using Inner Join and Where Clause

Often times when setting up database tables it’s easy to organize the same foreign key names in different tables. It’s even harder to maintain discipline in your MySQL calls by specifying the table name before the field name. I spent about 30 minutes trying to sort this out the other day and it turned out to be a simple mistake.

I was trying to do an inner join on two tables with a “WHERE” clause. I was using something called “author_id” in both tables and failed to specify which table for the where clause. I kept getting a mysql error:

Column 'author_id' in where clause is ambiguous

For one reason or another I didn’t think to specify the table name on the where clause until I did some research. So this is just a reminder…If you’re doing joins on tables with the same field names, it helps to specify the table name in the where clause.

Wrong…

SELECT * FROM bookmarks INNER JOIN articles ON articles.id=bookmarks.article_id WHERE author_id=1

Right…

SELECT * FROM bookmarks INNER JOIN articles ON articles.id=bookmarks.article_id WHERE bookmarks.author_id=1

That’s it. Just a reminder. If you see an error “Column is ambiguous” in your SQL output, make sure to use those table names!