Upgrading WordPress Breaks All My Links!

Recently, I wrote about moving a wordpress blog from one domain to another. Whilst transferring my girlfriends blog to another domain I noticed her blog was out of date. So I decided to update to wordpress 3.1 before I moved it. Bad choice, a simple rule to making changes in programming is this, “Make one change at a time and test after each change.” This rule of thumb helps establish a line of credibility and allows the programmer to know what change broke the code. In this case, not only did I transfer to a new domain, I also updated wordpress and had no way of knowing which change broke my website.

I went on a bit of a tangent, but basically when I finished the transfer none of the links on my girlfriend’s site worked. I couldn’t figure it out and spent close to 8 hours today troubleshooting her site. After running a simulation of transferring an older version of wordpress I realized the problem was caused by updating to wordpress 3.1.

This led me to investigate if anyone else had similar problems. It turns out there are a whole slew of problems associated with wordpress 3.1 and permalinks. Here are some common fixes:

  1. Refresh the wordpress permalinks. Simply navigate to “permalinks” under “Settings” and click the save button. Make sure WordPress is updating your .htaccess file properly.
  2. Make sure the problem links aren’t hard coded into the template you’re updating.
  3. (This fix solved my problem) Update all your plugins! I had a plugin called Simple Tags installed on the site and that was causing the .htaccess to act a bit funky. If you upgrade, make sure all your plugins are up to date, if there is no update for them, make sure you individually test each plugin by deactivating it.

That’s if for now, just remember to update all your shit before you start hardcore troubleshooting!

Moving a WordPress Blog to a New Domain

I’ve had to move many WordPress blogs from one domain to the next. As a result, this process has become fairly repetitious. So I thought I would share my experience. First, some disclaimers.

  1. If you don’t know what your doing, it might make sense to pay someone else to move your blog…
  2. If you’ve never run an SQL query, this tutuorial probably isn’t for you. However, if your still feeling adventurous try it out!
  3. You will need FTP access, phpMyAdmin or some other SQL client access, and you may need root or WHM access if you run a VPS.
  4. If you have hardcoded any urls into your themes you will need to manually change these urls to match the new domain.

Getting started…

Our goal is to move the site to a new domain first. Once we’re sure the site is up and running on the new domain, we can safely redirect the old domain to the new one. Make sure you have access to the name servers of both your domains. If you’re using godaddy to purchase your domains you should be able to configure this under “Domains” -> “Domain Management” -> “Domain Manager”. We’ll talk more about this in the next step. For now, just make sure you have:

  1. FTP client (filezilla)
  2. Live site editor (Coda)
  3. Access to your hosting account
  4. Domain management tool and
  5. Sql client

Setup…

Let’s say you just bought the new domain you wish to host the wordpress site on. Let’s also say you’re using Godaddy to register domains (domain registrar). In my case, I have a Virtual Private Server that I host my sites with and I register all my sites with godaddy, so I usually point my domains at my hosting and then set up a package for each one. If you have no idea what I just said, don’t worry. Keep reading…

  1. The first thing I want to do is point my domain to the proper hosting account (if you are hosting with godaddy skip this step). I do this by going to Domains -> Domain Management ->Domain Manager -> new-domain.com and click on “set nameservers”. Point your name server to wherever you’re hosting your sites (usually ns1.yourhostingdomain.com and ns2.yourhostingdomain.com).
  2. Make sure you have a package and account setup to receive incoming requests from that domain. This is done by setting up a new package and account on your hosting server. It’s beyond the scope of this tutorial for me to tell you how to do this, but I can tell you that you will need to have this completed before your server will receive and act on requests coming from your new domain.
  3. Double check that your current domain is working properly and the site is behaving as normal.

Download the Original Site…

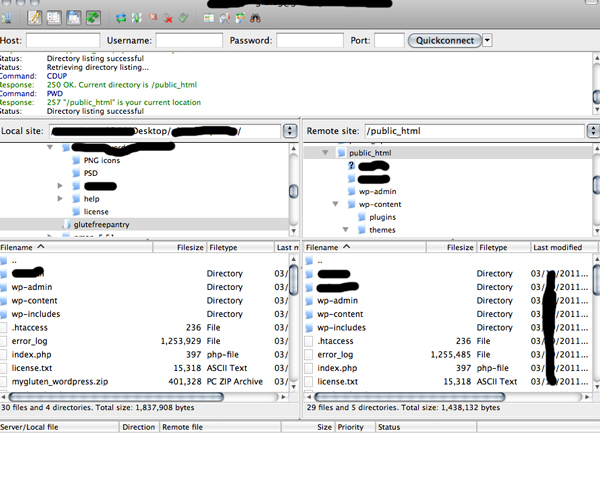
You will begin by opening up your ftp client and downloading your wordpress installation at your old domain. Double check that there are no failed file transfers. Once the download is complete, make sure you keep these files. This is your site backup.

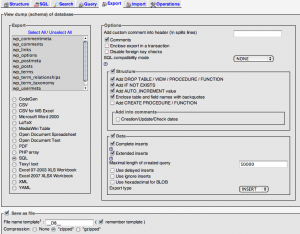
You will also make an sql dump of your old domain. Do this by going into the back of phpMyAdmin or any sql client, click on the database your wish to download and click “export.” Make sure you have the settings shown in the image below and then click “Go”.

Save the downloaded zipped file to your computer and move to the next step.

Upload to the New Domain…

Now that your have downloaded your entire wordpress installation and the database associated with your site, you need to upload it all to the new domain. If you are hosting with godaddy, it should create a directory for the root of your domain. If you want your blog to appear when you type in “domain.com” then this is where you would upload you wordpress installation. If you want your blog to appear at “domain.com/blog” then you would create a folder in your root directory and name it “blog” then upload the entire wordpress installation to /blog.

Once your are finished uploading the wordpress site to the proper hosting directory you need to add the SQL Database. Create a new database on your new domain hosting account and navigate in you SQL client to that database. Click “Import” and upload your zipped sql file.

You should see a green box appear indicating a successful upload. Now you need to enter some SQL commands to change the database to operate with the new domain name. navigate to your SQL tab and begin entering:

UPDATE wp_options SET option_value = replace(option_value, 'http://old-domain.com', 'http://new-domain.com') WHERE option_name = 'home' OR option_name = 'siteurl';

Then enter:

UPDATE wp_posts SET guid = replace(guid, 'http://old-domain.com','http://new-domain.com');

Then enter:

UPDATE wp_posts SET post_content = replace(post_content, 'http://old-domain.com', 'http://new-domain.com');

Doing this ensures wordpress knows it’s on the new domain and won’t make links and such reminiscent of the old domain. Now we just have one more step to go!

Change wp-config.php…

So far, we’ve uploaded the wordpress site on the old domain to the new one. We’ve updated our sql to reflect the new domain name and we’ve double check to make sure our old site is still working just fine. Now we just need to hook it all together.

Open up your favorite live site editor (I prefer coda but you can use anything you like, notepad++ is a great editor if you are on a Windows machine). Connect to your new domain and navigate to your wordpress installation root. There your should find a file called wp-config.php, open it. Scroll down and enter in the new Database connection information. This will allow the new wordpress installation to connect to the new database.

Once you’ve edited the wp-config.php file. Save it and navigate to your new domain in your browser! You should see an exact replica of your old site on your new domain! Start clicking some links real quick and make sure everything is working correctly.

Groove Shark Widget Trouble

For everyone out there who has had trouble getting their playlists to be recognized when they login to the grooveshark widget platform here: http://widgets.grooveshark.com/my_widgets

The problem seems to be something where Grooveshark can’t pull in your account information associated with any past widget IDs. However, if your widget is still playing on your website you in luck!

Requirements:

Make sure you have firefox or some other browser with an html inspector. If you don’t, this tutorial probably isn’t for you.

What to do…

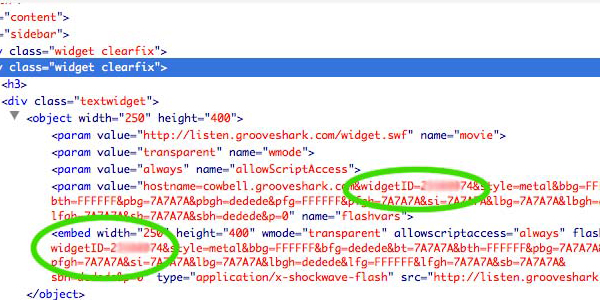
Go to your web page where you embedded the widget. Inspect the element containing the flash object. Look at the actual embed code and find the variable that says “widgetID=” this is your widget ID stored somewhere on the Grooveshark servers. It’s also the key to your widget. Now that Grooveshark has lost track of you widget, you need to manually tell it where to find it. You will use your widgetID to find it.

Now that you have the widgetID copied somewhere safe, let go back to our widget editor and find our widget!

Navigate to the widget editor page, and click on the “Make a New Widget button.” Once the page loads and you are in the widget editor click “Next Step” since we don’t actually care what the style (it will change once we load in your old widget).

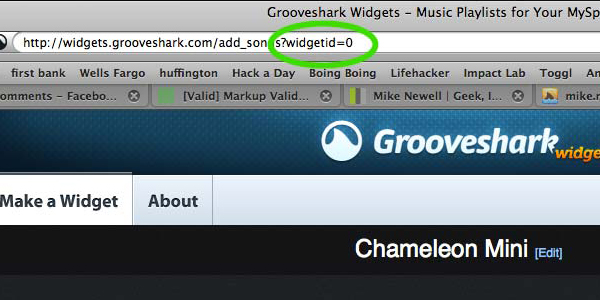
Once the page loads again, you will notice the URL has a space for “?widgetid=0”.

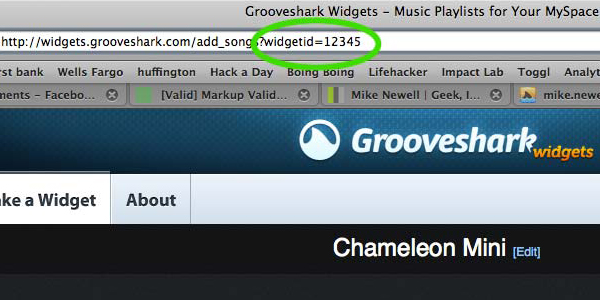
This is where we want to enter in our old widget ID. Simply replace the “0” with your widgetID. Hit enter after you have copied in your widgetID and whablam! Your old widget appears before your eyes. At this point the editor will work on your widget and you can edit and re-save you widget. You account will probably not find this widget so you may have to manually enter your widget ID every time. But if it works it works!

Thanks for checking in!

jQuery Flashlight

It’s simple really…

The text is black and the background is black, so you can’t see the text, it looks blank. However, when you hover your mouse over the page, a background image with a color of white follows your mouse, giving the illusion of a flashlight on the page!

Simply make an html page like this. Then give the page or a block a black background.

			#black {
				background-color: black;
			}

Then give the element a background image, with the flashlight.jpg file.

			#black {
				background-color: black;
				background-image: url(https://iwearshorts.com/flashlight/images/flashlight.jpg);
				background-repeat: no-repeat;
				cursor: crosshair;
			}

That’s it! The jQuery just makes sure to track the mouse and move the background image along with it, this gives users the illusion that a flashlight is being shown over the text.

			jQuery(document).ready(function() {
				jQuery("#black").mousemove(function(e){
					jQuery("#black").css('background-position',(e.pageX - 250)+'px '+(e.pageY - 250)+'px');
				});
			});

View the Demo.

Goo.gl URL Shortener

Here’s a simple class for URL shortening using Google’s new URL API:

<?php

class GUrl {
	$api_url = "https://www.googleapis.com/urlshortener/v1/url?key=";
	$key;
	
	function __construct ($key = "YOUR_API_KEY") {
		// set up the API key if it exists
		$this->key = $key;
	}
	
	public function shortenUrl ($url) {
		curl_init();
		// concatenate the API url
		curl_setopt($ch,CURLOPT_URL,$this->api_url . $this->key);
		curl_setopt($ch,CURLOPT_POST,1);
		// send the json ecoded long version of the url
		curl_setopt($ch,CURLOPT_POSTFIELDS,json_encode(array("longUrl"=>$url)));
		curl_setopt($ch,CURLOPT_HTTPHEADER,array("Content-Type: application/json"));
		curl_setopt($ch,CURLOPT_RETURNTRANSFER,1);
		// execute
		$result = curl_exec($ch);
		// close
		curl_close($ch);
		// return the result
		return ($result['id'] = json_decode($result,true)) ? $result['id'] : false;
	}
}

?>

That’s it! Just one function to have cURL send Google the URL to be shortened and it should return a response with the shortened version contained within the parameter [‘id’]. The great thing about using google for this is later we can build a class to retrieve periodic analytics on these urls and see which links are performing well.

Array Based Templating System

Update: After experimenting with options in array based templating engines I have discovered that it’s not practical to use PHP as the platform for this technique. The fact that PHP does not allow identical array keys means that you can’t currently implement an array based template engine with say more than one paragraph tag since the <p> is output by setting an array key as such. Anyway, read on to get the full experiment:

While reading Agile Development with Rails, I came across an idea…small but it could be fairly powerful if done right. The question came up in the book about whether to include embedded ruby (ERb) within the view document itself. I wondered how a dynamically generated HTML page could exist without this functionality in a programming language…

Coming from PHP, I naturally just assumed that web programming languages either had some way to embed dynamically executed code into view elements or would have to simply print out every single line requiring something like a heredoc:

<?php
   $heredoc = <<<HEREDOC
       <p> This is some HTML inside a heredoc </p>
HEREDOC;

   echo $heredoc;
?>

However, PHP has great libraries for working with XML which is basically all HTML is…So let’s say we wanted to make a templating system strictly in PHP and then create a statically accessed but dynamically generated index page otherwise known as a cache…

First we’d load the page into our view.php file:

<?php
$xmlstr = <<<XML
<?xml version='1.0' standalone='yes'?>
<html>
 <head>
  <title>PHP: Behind the Parser</title>
 </head>
 <body>
  <h1>Hello World!</h1>
 </body>
</html>
XML;
?>

Let’s say we want that “Hello World” to be dynamic, so we’d replace the “Hello World” with a variable:

<?php

$dynamic_variable = "Hello World";

$xmlstr = <<<XML
<?xml version='1.0' standalone='yes'?>
<html>
 <head>
  <title>PHP: Behind the Parser</title>
 </head>
 <body>
  <h1>$dynamic_variable</h1>
 </body>
</html>
XML;
?>

Now we have a dynamic variable in a templated system, but not all that useful. We could just write this XML to a file, name it index.html and it would be a valid cached page…but not very exciting. However, what if we use PHP’s SimpleXML module to dynamically interact with this array, now we have dynamic access to any item in the page’s HTML in object format. Let’s add a paragraph with a class of “stuff” that says “This is an added element” underneath the h1 element:

<?php

$dynamic_variable = "Hello World";

$xmlstr = <<<XML
<?xml version='1.0' standalone='yes'?>
<html>
 <head>
  <title>PHP: Behind the Parser</title>
 </head>
 <body>
  <h1>$dynamic_variable</h1>
 </body>
</html>
XML;

$xml = new SimpleXMLElement($xmlstr);

$paragraph = "This is an added element";
$p = $xml->body[0]->addChild('p', $paragraph);
$p->addAttribute('class', 'stuff');

?>

Pretty cool, but it still isn’t too helpful, we can access every item on the page template…but we can’t easily remove children or alter the flow of the document. What we need is something in an array format. That way, if we need to, we can push() pop() and sort any information we’d like. Additionally, we can load arrays into convenient looping methods like foreach(). So let’s build our HTML page as an array:

<?php

$page = array (
            "head" => array("title" => "The Title"),
            "body" => array("h1" => "Hello World!", "p" => "This is a paragraph!")
                );

function assocArrayToXML($root_element_name,$ar)
{
    $xml = new SimpleXMLElement("<?xml version="1.0"?><{$root_element_name}></{$root_element_name}>");
    $f = create_function('$f,$c,$a','
            foreach($a as $k=>$v) {
                if(is_array($v)) {
                    $ch=$c->addChild($k);
                    $f($f,$ch,$v);
                } else {
                    $c->addChild($k,$v);
                }
            }');
    $f($f,$xml,$ar);
    return $xml->asXML();
} 

echo assocArrayToXML("html", $page);

?>

Nice! So now we can access any part of the page template without a bunch of messy HTML and PHP mixed together. If you look closely you don’t even have any greater than or less than symbols (other than to demarcate arrays)! Unfortunately, that’s about as far as you can go with an array. Due to the limitations of PHP, you cannot have two unique items with the same keys in an array. So in this model, I would not be able to generate more than one paragraph tag. This makes certain HTML necessities like list items impossible and thus this templating system unreasonable. The only way to make this system work would be to give each item in the array a unique id to make each key unique.
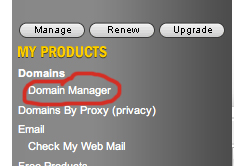
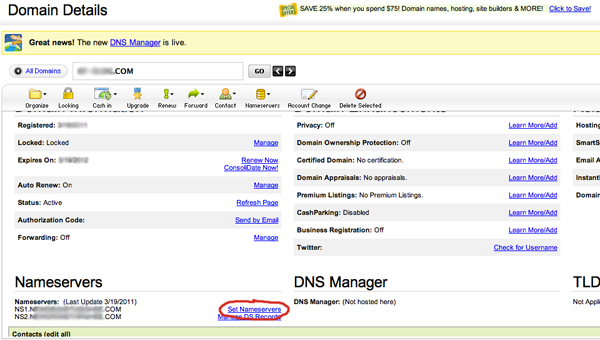
Photo Study: Light

Amazing light in the kitchen this morning so I decided to whip out the ol’ D-90 and try to get better at photography! I just wanted to study the light, specifically, what adjustments I could make to alter the way the image appears. I wanted to capture the atmosphere of the room and play with the intensity of the lighting:

Lessons learned, this photo would have been perfect but I wasn’t watching my background and managed to get a bunch of beer bottles in the frame…dangit!

This picture had good balance lightwise, but I couldn’t manage to filter out the shadows on the wall, kind of distracting I think…

After Not being able to remove the shadows from the wall I altered the f-stop and ISO settings, gave it a slower shutter speed and managed to amp up the light…but I still caught those damn shadows!

Here I boost the light too much, a really low f-stop, low light sensitivity but a really long shutter speed make this photo way too dramatic.

Finally….

This was one of the first shots I took before I started playing with lighting. At the very least, I learned to watch my backgrounds more closely.

Ruby, Rails and CentOS with Knownhost and cPanel

This article is primarily for those hosting a VPS with Knownhost and using a CentOS/cPanel combination. However, if the server was set up correctly, this tutorial should work with any CentOS/cPanel server.

Where to start?

To begin, you must have atleast minimal experience with the command line interface. Users should have SSH access and know how to use it. If you have heard of Putty before, then you are probably good to go. We will be installing ruby manually, installing rails through gem and installing sqlite3 manually, please find out before hand that you absolutely need the newest version of ruby and rails before you update this. Managing ruby and gems is far easier if done through the gui cPanel interface. However, at the time of writing this they only allow upgrades to 1.8.7 and I needed 1.9.2 so here we go!

Installing Ruby 1.9.2:

Before we can do anything we need the newest version of ruby.

  1. Log into your command prompt and check the version and which ruby you are using:
    ruby --version
    which ruby
    
  2. Most likely, your ruby version should be located at: /usr/bin or /usr/local/bin, now you must decide where to download your installation – I chose /var/tmp – change to that directory:
    cd /var/tmp
  3. Now grab the latest version of ruby (this may be out of date by the time you read it so look here for the latest version, simply copy the url of the download link on this page):
    wget ftp://ftp.ruby-lang.org//pub/ruby/1.9/ruby-1.9.2-p180.tar.gz
    
  4. Now that we have a fresh copy on our server, extract the zipped file (I downloaded a tar.gz file so extract with tar -zxf):
    tar -zxf ruby-1.9.2-p180.tar.gz
    
  5. Change into the newly created directory after your done extracting:
    cd ruby-1.9.2-p180
    
  6. Configure the Makefile:
    ./configure
    
  7. Build the executable:
    make
    
  8. Install the program:
    make install
    
  9. Check which path we are using for ruby:
    which ruby
    
  10. Check to see which version of ruby we are using:
    ruby --version
    

If everything went smoothly you should have the newest version of ruby running on your system. It should most likely be run from /usr/local/bin and the version should match the filename you just downloaded.

Now Install Rails:

  1. This step is pretty easy, simply type in the command below and watch the magic happen:
    gem install rails
    

If everything here worked correctly you should now have rails on your system! However, you probably won’t be able to run a rails server yet, if you enter the command below and receive an error about sqlite being out of date, then continue…

Install sqlite3:

If you typed “gem install sqlite3-ruby” and it didn’t work, the you most likely need to compile the most recent version of sqlite3 manually. Here is where you can find the most up to date versions, I chose to install the tar.gz version.

  1. change to your /var/tmp directory again:
    cd /var/tmp
    
  2. Find the link for the most recent version of sqlite3 and copy it, then download it to your server:
    wget http://www.sqlite.org/sqlite-autoconf-3070500.tar.gz
    
  3. Unpack it:
    tar -zxf sqlite-autoconf-3070500.tar.gz
    
  4. Change to the newly created install directory:
    cd sqlite-autoconf-3070500
    
  5. Configure the Makefile:
    ./configure
    
  6. Make the application:
    make
    
  7. Install the application:
    make install
    

If everything went well, you should have the newest version of sqlite3 installed on your server but you still need ruby to talk to it, so issue the command:

gem install sqlite3-ruby

Now Ruby should have a gem installed called sqlite3! This will allow you to run a ruby server.

Test Your Setup:

Now that you have installed everything you need to get your ruby server and rails application up and running you need to test to make sure it’s working.

  1. Navigate to your /home directory or wherever you are comfortable setting up a test blog:
    cd /home
    
  2. Run the following command:
    rails new blog
    
  3. This has set up a very basic blogging application at (in my example) /home/blog, change to that directory:
    cd /home/blog
    
  4. Run the rails server and navigate to your server to port 3000 to check it out! For instance, go to “http://mydomain.com:3000” or if you don’t have a domain for your server, just put in the IP address, so “http://11.111.11.11:3000”.
    rails server
    

That should be it for getting your rails server up and running on a CentOS system running cPanel just like Knownhost’s setup. Now if you’d like to set up a database and get started building applications, I would advise checking out:

Compiling From Source: Ruby 1.9.2 on CentOS

Recently I tried to upgrade ruby on my server. Installation was supposed to go something like this:

cd /tmp
wget ftp://ftp.ruby-lang.org//pub/ruby/1.9/ruby-1.9.2-p180.tar.gz
tar -zxf ruby-1.9.2-p180.tar.gz
cd ruby-1.9.2-p180
./configure
make
make install

However, when I got to the “./configure” command, I would return a c compiler error. So I check my c compiler and it was in fact working… Then I tried another version of ruby with the same result. So I did some searching…

It turns out, if you set your server up a long time ago or are running a VPS that has been set up by other admins, there might be a chance you have your /tmp directory mounted with the ‘noexec’ option. This will option will block any execution of programs within the /tmp directory itself. So you have a couple options:

Download to /tmp then tar to some other folder (I used root for example, probably a bad example)

cd /tmp
wget ftp://ftp.ruby-lang.org//pub/ruby/1.9/ruby-1.9.2-p180.tar.gz 
tar -zxf ruby-1.9.2-p180.tar.gz /root/ruby-temp
cd /root/ruby-temp/ruby-1.9.2-p180
./configure
make
make install

Download to Another Directory and Install

cd /root
mkdir /root/ruby-temp
cd ruby-temp
wget ftp://ftp.ruby-lang.org//pub/ruby/1.9/ruby-1.9.2-p180.tar.gz 
tar -zxf ruby-1.9.2-p180.tar.gz
cd /root/ruby-temp/ruby-1.9.2-p180
./configure
make
make install

Best Option: Change Permissions on the /tmp Directory (remember to change it back when finished!)

mount -o,remount,rw,exec /tmp
cd /tmp
wget ftp://ftp.ruby-lang.org//pub/ruby/1.9/ruby-1.9.2-p180.tar.gz 
tar -zxf ruby-1.9.2-p180.tar.gz
cd ruby-1.9.2-p180
./configure
make
make install
mount -o,remount,rw,noexec /tmp

Also Try: /var/tmp

* If you don’t have permission to change the “exec” option on the /tmp drive, you can also try and compile from the /var/tmp directory. The same command can be executed on the /var/tmp directory as well:

mount -o,remount,rw,exec /var/tmp
mount -o,remount,rw,noexec /var/tmp

So like this:

mount -o,remount,rw,exec /var/tmp
cd /var/tmp
wget ftp://ftp.ruby-lang.org//pub/ruby/1.9/ruby-1.9.2-p180.tar.gz 
tar -zxf ruby-1.9.2-p180.tar.gz
cd ruby-1.9.2-p180
./configure
make
make install
mount -o,remount,rw,noexec /var/tmp

Or just:

cd /tmp
wget ftp://ftp.ruby-lang.org//pub/ruby/1.9/ruby-1.9.2-p180.tar.gz 
tar -zxf ruby-1.9.2-p180.tar.gz
cd ruby-1.9.2-p180
./configure
make
make install

Hope that helped!

Hidden Messages in Images

There’s a technique called “steganographic encoding” where one hide’s a text message or even a whole file structure inside a seemingly normal image. We’re going to make a simple version of this!

  • First, let’s find an image to use…I chose this self portrait I snapped while RJ was playing around with reactivision.

  • Next, lets decide what we want in our message… for now I’ll just make up some text. I’ll type “This is a secret message” in a text file. You could have a whole set of files if you wanted, just compress them into a zipped folder. Save this file (as a .txt) and the image (as a .jpg) into a folder on your Desktop.

  • Now open a command prompt (Windows 7 & vista just open the start menu and type “cmd” – XP users, just go to start -> run -> then type “cmd”)
  • Change to the directory where your image and text file are stored on your desktop. Issue the command:
  • cd C:UsersOwnerDesktopsecret
  • Type the following: (you must change the file names to your own…I used secret.jpg and secret.txt)
  • copy /B secret.jpg + secret.txt new.jpg

  • Hit enter and the DOS prompt should create a file called new.jpg in the same directory you were working in. The /B you entered above is to copy binary data, which simply copies the text data onto the end of the JPEG image. However, when you open the image, the image header tells your computer to stop reading after the length of the image…thus no one will know that there is more information available.

  • To get the information out of this image, simply change the file extension of the new image to “.txt” instead of “.jpg” and your computer should be able to read the message. In fact, for added security, you could zip the text files up and password protect the directory before copying it.

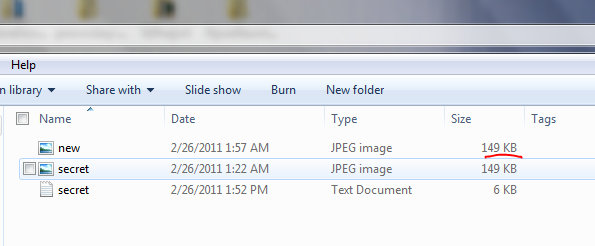
You can see from the image above that the text “This is a secret message!” didn’t take up very much room in the file, so a user wouldn’t see a different file size. However, I put alot of information in that image, say from this page, then the file size will change significantly. This can tip people off if the filesize of images is not roughly what they expect.

Below is the large image, try and decode it’s message! Simple right click the image, save it to your Desktop and change the file extension to “.txt” or simply open the image in a text editor like notepad++. You should then be able to read the secret message! Have fun…

Motivation Behind the Article:

Recently, the Anonymous group hacked an infamous church organization during a live interview. It’s gotten a lot of press because of the skill and precision with which the attack was carried out. The fact that it was done during a live interview with one of the members of the Anonymous Group conveys a sense that these hackers can effortlessly and reliably take down networks at will. I think it’s sad that the majority of the web population doesn’t have any idea how to do something like this. We’ve recently seen examples of why the lack of fundamental knowledge about hacking is a bad thing. It’s better IMO to be at least cognizant of such things rather than taking the whole “head in the sand” approach. Possessing knowledge about internet infrastructure and how to circumvent it might be the equivalent to our founding fathers’ intent on the right to bear arms.

We’ll be starting off this week with an old trick (from 1985) used to hide messages in seemingly innocuous images. It’s pretty simple, if no one suspects the image of containing a message then information can flow freely without fear of discovery. Suddenly, a person with this skill can communicate freely without fear of censorship. Online, sites like flickr and forums become instant message boards without anyone knowing. In fact, it was suspected that terror groups where using these same channels to communicate back in 2001. However, not everyone who needs to communicate in this way is a terrorist. There are plenty of legitimate reasons for the public to be made aware of this technique. If nothing else,