Quick Texturing in Blender with Bump Maps

In the following video I show how to quicky texture (and preview) a mesh object with bump maps and normal maps in order to give your 3d objects more realism and “pop”. Basically, the issue with a flattened texture on a 3d object is the complexity. To the human eye, inconsistencies and defects make something look more “real”. Sometimes the style of your project will require a gently shaded “paper like” feel to it. In which case it’s ok to have flattened textures and colors.

Other times you will want something to feel more like it has depth and exists in the real world. An easy way to produce this effect often times is to give something a bumpy feel which can be done through normal/bump maps. In effect it’s just another texture being rendered on your mesh, but instead of telling the renderer what colors to emit, the bump map tells the renderer how the light should bound off things, producing the desired “bumpy” effect. There’s not actual geometry at play here which makes things cheaper in terms of rendering while producing a realistic surface. Bump maps are used extensively in gaming to produce realistic effects without costing the rendering engine a whole lot of compute time.

Check out the video below to see how one might add this effect to a mesh object.

Remove Duplicates in Text File

So I have a list of names, but the names are duplicated down the page. Each name is on a new line by itself.

If I want to remove all the duplicates and just find out who is included in the file, I can simply do:

[pastacode lang=”bash” manual=”awk%20′!seen%5B%240%5D%2B%2B’%20filename” message=”” highlight=”” provider=”manual”/]

This will remove duplicates and print them to your terminal.

WebStorm Encoded my HTML File as UTF-16BE

If you use webstorm you’ve probably run into this issue before. It use to happen more in past versions when I would add non-UTF-8 characters to my files. Basically, webstorm would output the wrong file encoding.

To get around this you really only have one option. To re-encode your file content and filter it yourself. If you simply copy the wrongly encoded file output and try to paste that into a UTF-8 file, it will re-encode and you end up back where you started.

You have to replace the file:

[pastacode lang=”bash” manual=”iconv%20-f%20UTF-16%20-t%20UTF-8%20%5Bpath%2Fto%2Ffile%5D” message=”” highlight=”” provider=”manual”/]

Blam.

If that doesn’t work, you can do the step above to sanitize, then copy the content and make a new file (UTF-8) and paste.

Normalize/Reset Object’s Scale in Cinema4D

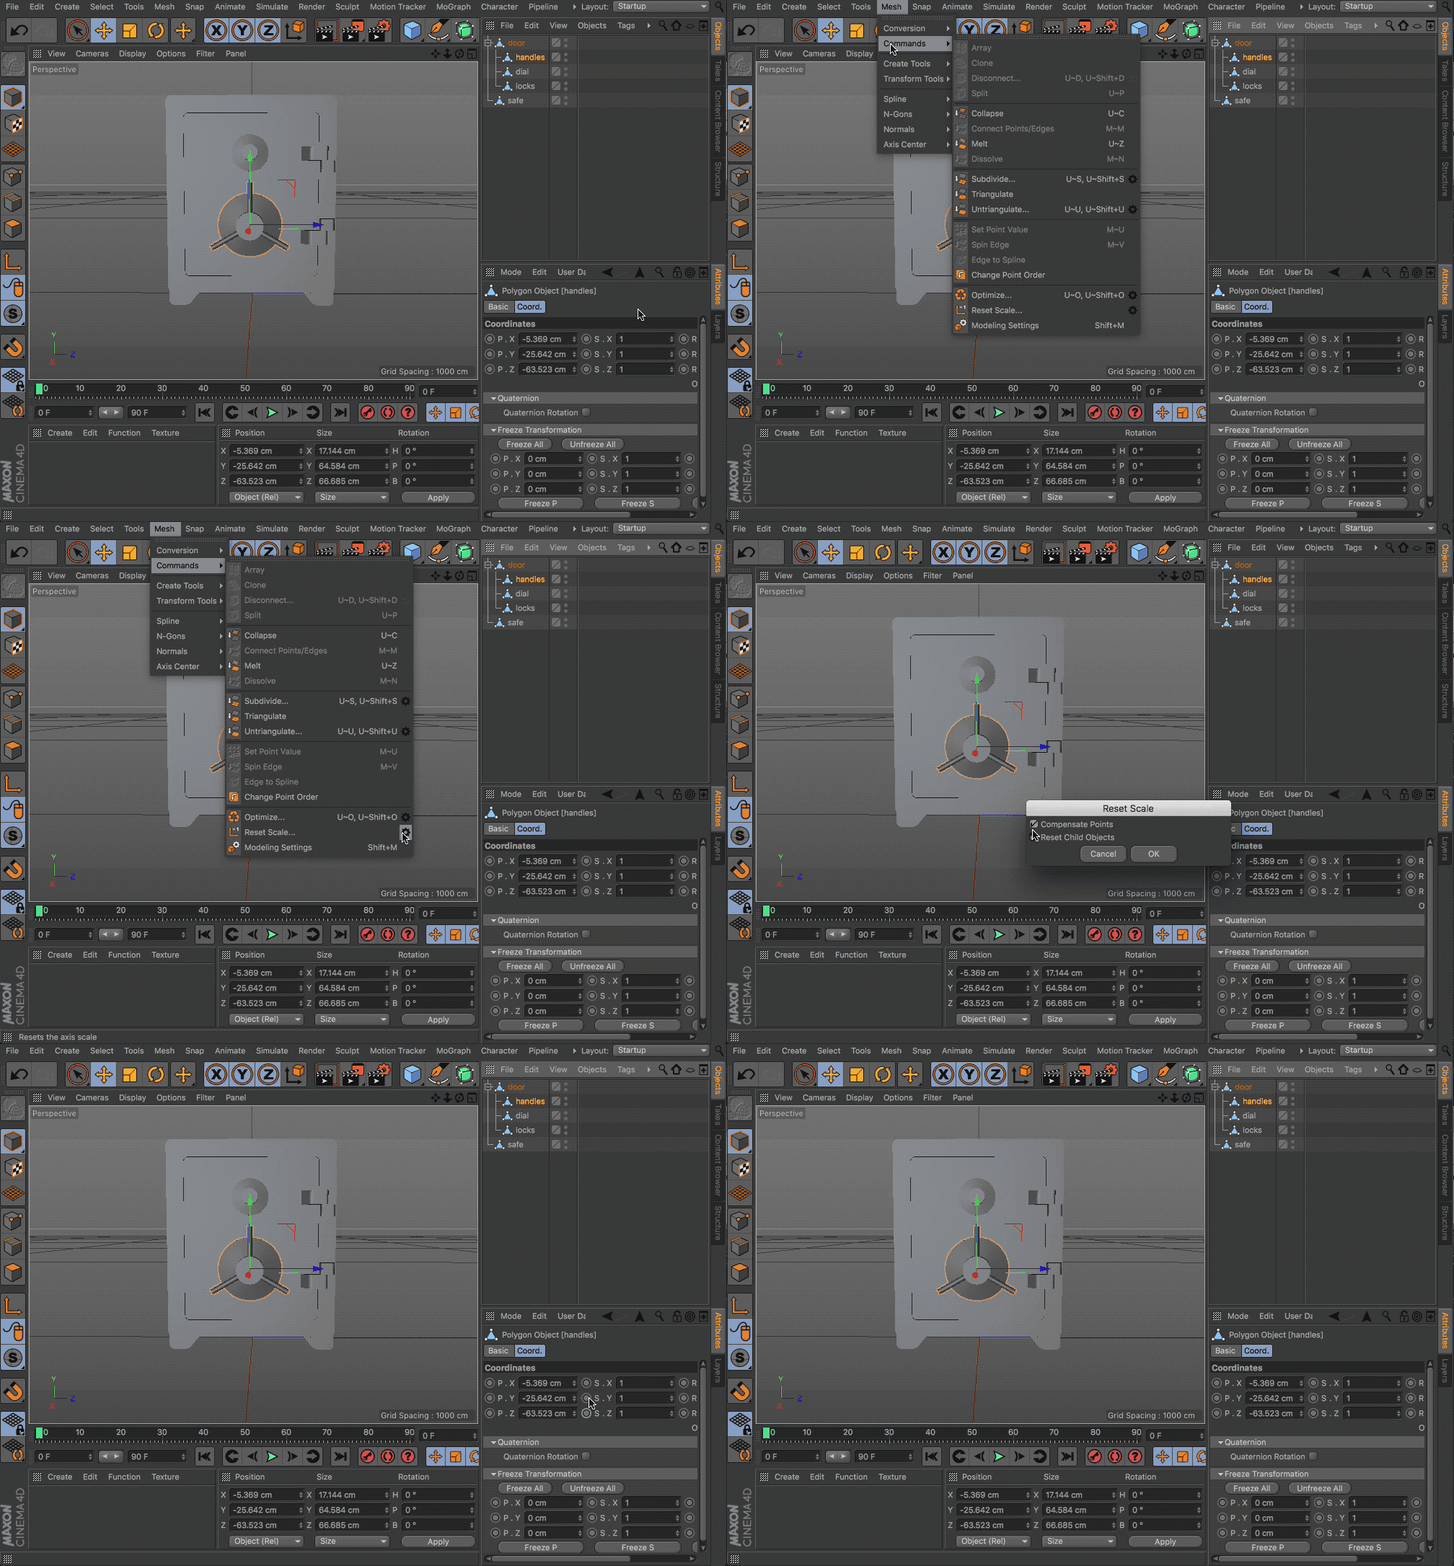
In the gif below I show how to normalize the objects scale so you don’t need to re-scale when copying and pasting. Otherwise the workflow would be to copy the object and re-scale the object from original size every time. This is problematic when working more with models that need to be 3D printed than web stuff. WebGL things need to be scaled appropriately to convince a user visually. Hover exact dimensions can be fudged a bit as long as the user wouldn’t notice.

However, when dealing with things that need to be 3D printed, items need to be “air tight” and fix to exact spec. Millimeters of difference can result in a print either not fitting a component or can cause edges that were separated to “print together” and combine during the print process. So to be as accurate as possible, when copying components, setting the scale below will reproduce reliably.

Let’s say you have an object that you’ve scaled already. You don’t want to keep having to scale it every time you copy it. You can normalize it by:

Simple Shader with ThreeJS

Ok folks, it doesn’t get easier than this. If you want to start writing shaders in the browser but can’t figure out how to create your shader program, ThreeJS has you covered.

To write a shader in GLSL (oenGL Shading Language) you first need to let the browser know where you’re going to put your program. Some the shader stuff might look like a combination of javascript and C to you, however, it’s actually GLSL. That’s the language you write shaders in for the web. In order to start writing shaders, you first need to have something to shade. Which means you need to have atleast a simple 3 dimensional object upon which the shader can begin “shading”. The most simple is a plane (two triangles put together into a square) which you will use below to start experimenting with shaders.

Just like drawing with canvas and javascript you need a context. WebGL (the technology threeJS uses) uses the same canvas element that you might be used to drawing with in 2D. Basically instead of get a context of “2D” we are going to get the canvas context of “webgl” instead.

[pastacode lang=”javascript” manual=”const%20gl%20%3D%20canvas.getContext(‘webgl’%2C%20%7B%0A%20%20antialias%3A%20false%2C%0A%20%20depth%3A%20false%0A%7D)%3B” message=”” highlight=”” provider=”manual”/]

Follow the instructions below to begin creating your own shaders. If you are having trouble getting started and don’t want to create your own contexts, you can easily use shadertoy to do the heavy lifting for you. It allows you to start writing GLSL immediately.

In your JS

[pastacode lang=”javascript” manual=”var%20camera%20%3D%20new%20THREE.Camera()%3B%0A%09camera.position.z%20%3D%201%3B%0A%0A%09var%20scene%20%3D%20new%20THREE.Scene()%3B%0A%0A%09var%20uniforms%20%3D%20%7B%0A%09%09time%3A%20%7B%20type%3A%20%22f%22%2C%20value%3A%201.0%20%7D%2C%0A%09%09resolution%3A%20%7B%20type%3A%20%22v2%22%2C%20value%3A%20new%20THREE.Vector2()%20%7D%0A%09%7D%3B%0A%0A%09var%20material%20%3D%20new%20THREE.ShaderMaterial(%20%7B%0A%09%09uniforms%3A%20uniforms%2C%0A%09%09vertexShader%3A%20document.getElementById(%20’vertexShader’%20).innerText%2C%0A%09%09fragmentShader%3A%20document.getElementById(%20’fragmentShader’%20).innerText%0A%09%7D)%3B%0A%0A%09var%20mesh%20%3D%20new%20THREE.Mesh(%20new%20THREE.PlaneGeometry(%202%2C%202%20)%2C%20material%20)%3B%0A%0A%09scene.add(%20mesh%20)%3B%0A%0A%09var%20canvas%20%3D%20document.querySelector(%22.lense-flare%22)%3B%0A%09var%20parent%20%3D%20canvas.parentElement%3B%0A%09var%20renderer%20%3D%20new%20THREE.WebGLRenderer(%7B%20canvas%3A%20canvas%20%7D)%3B%0A%09renderer.setSize(%20parent.clientWidth%2C%20parent.clientHeight%20)%3B%0A%0A%09uniforms.resolution.value.x%20%3D%20parent.clientWidth%3B%0A%09uniforms.resolution.value.y%20%3D%20parent.clientHeight%3B%0A%09var%20startTime%20%3D%20Date.now()%3B%0A%0A%09animate()%3B%0A%0A%09function%20animate()%20%7B%0A%09%09requestAnimationFrame(%20animate%20)%3B%0A%09%09render()%3B%0A%09%7D%0A%0A%09function%20render()%20%7B%0A%09%09var%20elapsedMilliseconds%20%3D%20Date.now()%20-%20startTime%3B%0A%09%09var%20elapsedSeconds%20%3D%20elapsedMilliseconds%20%2F%201000.%3B%0A%09%09uniforms.time.value%20%3D%2060.%20*%20elapsedSeconds%3B%0A%09%09renderer.render(%20scene%2C%20camera%20)%3B%0A%09%7D” message=”” highlight=”” provider=”manual”/]


In your head:

[pastacode lang=”markup” manual=”%3Cscript%20id%3D%22vertexShader%22%20type%3D%22x-shader%2Fx-vertex%22%3E%0A%09%09%09uniform%20float%20time%3B%0A%09%09%09uniform%20vec2%20resolution%3B%0A%09%09%09void%20main()%09%7B%0A%09%09%09%09gl_Position%20%3D%20vec4(%20position%2C%201.0%20)%3B%0A%09%09%09%7D%0A%09%09%3C%2Fscript%3E%0A%09%09%3Cscript%20id%3D%22fragmentShader%22%20type%3D%22x-shader%2Fx-fragment%22%3E%0A%09%09%09uniform%20float%20time%3B%0A%09%09%09uniform%20vec2%20resolution%3B%0A%09%09%09void%20main()%09%7B%0A%09%09%09%09float%20x%20%3D%20mod(time%20%2B%20gl_FragCoord.x%2C%2020.)%20%3C%2010.%20%3F%201.%20%3A%200.%3B%0A%09%09%09%09float%20y%20%3D%20mod(time%20%2B%20gl_FragCoord.y%2C%2020.)%20%3C%2010.%20%3F%201.%20%3A%200.%3B%0A%09%09%09%09gl_FragColor%20%3D%20vec4(vec3(min(x%2C%20y))%2C%201.)%3B%0A%09%09%09%7D%0A%09%09%3C%2Fscript%3E” message=”” highlight=”” provider=”manual”/]


Finding the cause of a horizontal scrollbar on your site

I was super tired when I posted this. It’s a old trick but one for the record books in terms of usefulness.

Basically, if you’re a web developer, there will be many times in your career that a site ends up with a gross unintended horizontal scrollbar. It’s always a content/layout issue and usually something you didn’t expect to take up horizontal space. Usually, setting:

overflow: hidden-x;

Will fix the offending element. But first you need to find it. Which may or may not always be clear depending on the size of your site. So how to find these offenders!

Simple:

[pastacode lang=”css” manual=”*%20%7B%0A%09%09outline%3A%201px%20solid%20red%3B%0A%09%7D” message=”” highlight=”” provider=”manual”/]

scroll down and right and you should find the highlighted block of content that’s causing the issue. It’s a wonderful trick because it makes things so visually clear.

Finding A Pixel in Canvas Image Data

I never have time, so this will be quick.

Let’s say we want to find a pixel index amoung all that image data canvas returns with:

[pastacode lang=”javascript” manual=”var%20imgData%20%3D%20ctx.getImageData(x%2Cy%2Cw%2Ch)%3B” message=”” highlight=”” provider=”manual”/]

The formula is simple:

[pastacode lang=”javascript” manual=”var%20y%20%3D%20%5BROW%5D%3B%0Avar%20x%20%3D%20%5BCOLUMN%5D%3B%0Avar%20w%20%3D%20imgData.width%3B%0Avar%20pixIdx%20%3D%20(y%20*%20w%20%2B%20x)%20*%204%3B%0Avar%20pixel%20%3D%20imgData%5BpixIdx%5D%3B” message=”” highlight=”” provider=”manual”/]

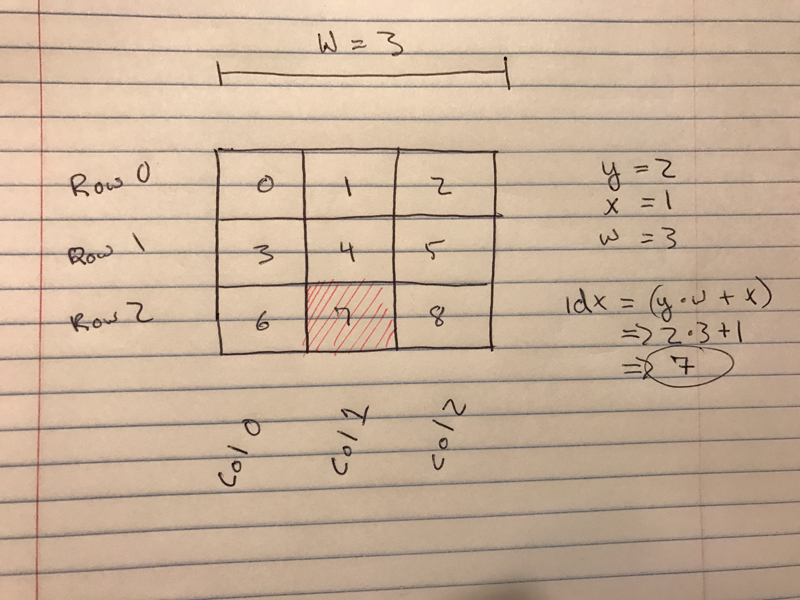
Basically, you need to draw this one out. Let’s say we have a 3×3 image. Each pixel would have it’s own zero based index. The width would be three. Each row would stretch from 0 – 2 and each column would stretch from 0 – 2.

pixels


Now let’s say we want to select the 7th pixel. We know the formula is:

index => (y * w + x)

So we can calculate the index by selecting Row 2 and Column 1. Just like battleship.

pix-index


The only confusing part is why we should multiply by 4 at the end! It’s simple really, there are 4 values for every pixel (r,g,b,a).

To loop through and get the index for every pixel, might look something like:

[pastacode lang=”javascript” manual=”for(var%20x%20%3D%200%2C%20w%20%3D%20imgData.width%3B%20x%20%3C%20w%3B%20%2B%2Bx)%20%7B%0A%09for(var%20y%20%3D%200%2C%20h%20%3D%20imgData.height%3B%20y%20%3C%20h%3B%20%2B%2By)%20%7B%0A%09%09var%20pixIndex%20%3D%20(y%20*%20w%20%2B%20x)%20*%204%3B%0A%09%09var%20r%20%3D%20imgData%5BpixIndex%5D%3B%0A%09%09var%20g%20%3D%20imgData%5BpixIndex%20%2B%201%5D%3B%0A%09%09var%20b%20%3D%20imgData%5BpixIndex%20%2B%202%5D%3B%0A%09%09var%20a%20%3D%20imgData%5BpixIndex%20%2B%203%5D%3B%0A%09%7D%0A%7D” message=”” highlight=”” provider=”manual”/]

That’s it.

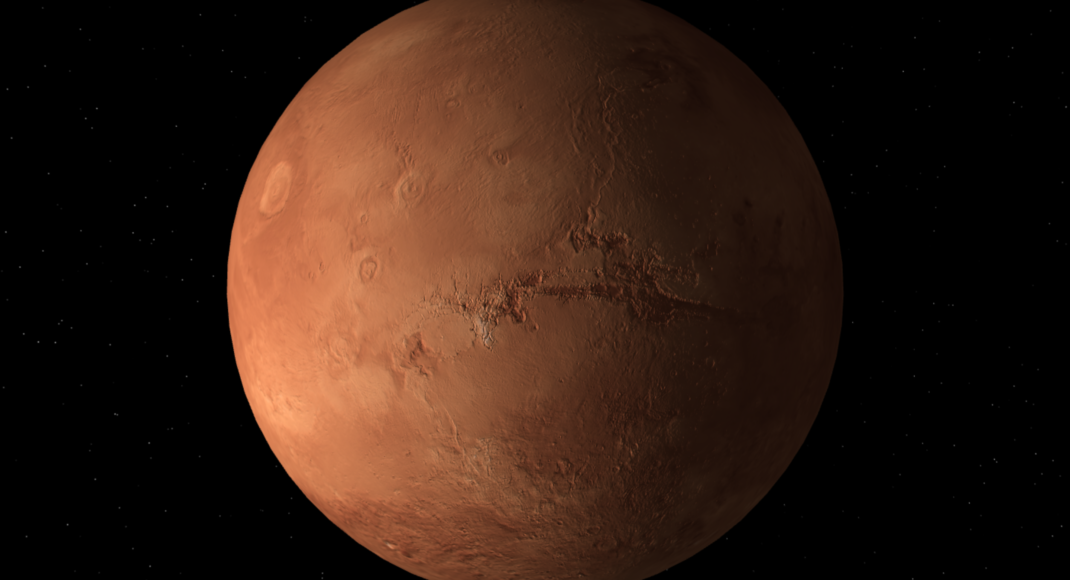
Mars VR Demo

Just wanted to post this. The source is pretty self explanatory and i’ll put up a github later once I clean up a few things.

I’ll explain later. Be patient, it takes a second to load.

DEMO –>

XHR Doesn’t Return responseURL in iOS8

So you’ve been making ajax calls and everything is going great.

Your onSuccess message looks something like this:

[pastacode lang=”javascript” manual=”var%20onSuccess%20%3D%20function(data)%20%7B%0A%20%20%20%20console.log(data.xhr.responseURL)%0A%7D” message=”” highlight=”” provider=”manual”/]

All of a sudden your QA professional says things aren’t working in iOS8!

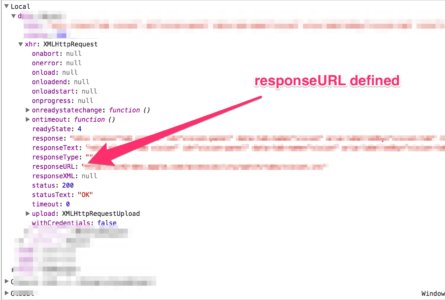
No prob, bob. It’s actually that iOS8 and below doesn’t return a “responseURL” attribute of the xhr object. Look at the difference:

iOS8 xhr object:

ios8

Everything else:

everything-else

Anyway…