Android Development 101: Simple App

I’m going to learn Android development, so I’m going to post a series of tutorials on basic android development. No need to explain more, here we go:

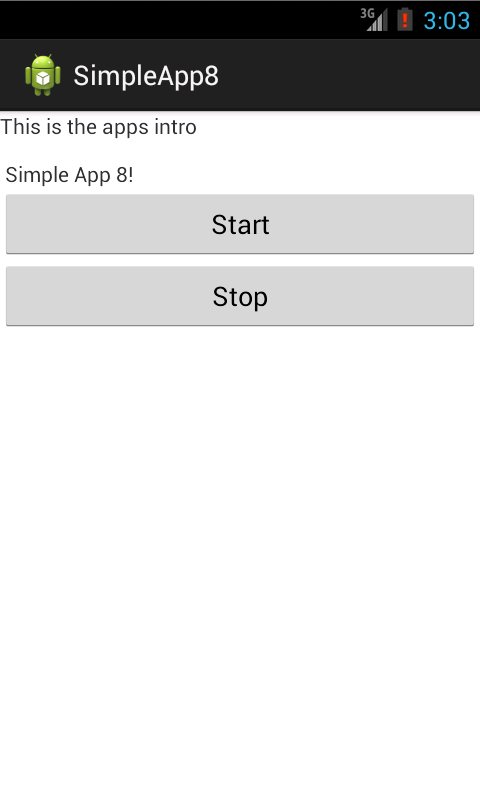
First off, I’m assuming you followed the setup guide here (http://developer.android.com/training/index.html) and have eclipse with the android development tools installed. Next we are going to make an app with two buttons. When you click one, you display a message that it was clicked, you also log the a message to the console (one of the first things you should do as a developer is figure out how to debug – log things to the console). It will look something like this:

I’m assuming you created a new android application project and named it appropriately. No need for me to write something new here, there’s a great resource on the android site (http://developer.android.com/training/basics/firstapp/creating-project.html).So lets get started, the first thing we need to do is adjust the layout to display our buttons and text. This is easily done in APP_NAME –> res –> layout –> activity_main.xml (or whatever you might have changed it to under the same folder). I’ll explain what each of these things mean in the comments in the xml file.

<!-- Set the layout to linear so all elements stack below on another -->
<LinearLayout xmlns:android="http://schemas.android.com/apk/res/android"
    xmlns:tools="http://schemas.android.com/tools"
    android:layout_width="match_parent"
    android:layout_height="match_parent"
    android:orientation="vertical" >

    <!-- Put your intro copy here -->
    <TextView
        android:layout_width="wrap_content"
        android:layout_height="wrap_content"
        android:text="@string/intro_text" />

    <!-- The first button with an ID of "button_start" it also calls a string of text with name "button_start" -->
    <Button
        android:layout_width="fill_parent"
        android:layout_height="wrap_content"
        android:id="@+id/button_start"
        android:text="@string/button_start" />

    <!-- The second button with and ID of "button_stop", it's text is called with the name "button_stop" -->
    <Button
        android:layout_width="fill_parent"
        android:layout_height="wrap_content"
        android:id="@+id/button_stop"
        android:text="@string/button_stop" />

</LinearLayout>

Don’t worry about much right now other than the fact that we want the layout to be vertically stacked and all elements to take up the full width of the page and wrap if they need to for the height of the content. You can assign ids to elements by calling:

android:id="@+id/ELEMENT_ID"

This tells the android app where to look for this element. We’ll use this later to look for a click event on the buttons.

If you’ve successfully copied this code above, eclipse will start to complain that you don’t have strings attached to the “android:text” attributes. It’s right, let’s put that information in next.

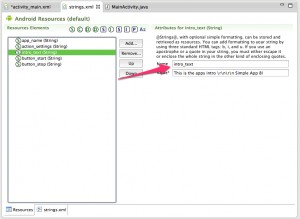
Under APP_NAME –> res –> values –> strings.xml , you need to input the strings. These are the text that you want displayed, in our case for our intro text and buttons. You can see above we are inserting something called “android:text=’@string/intro_text'” in our TextView element. Let’s define that first. Your input should look like the following:

You can see in the image, the arrow points to the name we gave the string. This helps us separate content from layout. Simply name a string, define the string’s value and you’ve connected the two points. Do the same for the two buttons:

Now you have all the strings defined. At this point your eclipse + ADT should not be complaining. You can run the app and see that there are two buttons and some text at the top. Great! Let’s get those buttons working.

In APP_NAME –> src –> com.example.APP_NAME –> MainActivity.java you should see some predefined code. I’ll paste the full code in and explain what it’s doing:

package com.example.simpleapp8;

// import the necessary packages
// as you code, if you require a package, simply hit ctrl + shft + o to auto-import the packages you need
import android.app.Activity;
import android.os.Bundle;
import android.util.Log;
import android.view.Menu;
import android.view.View;
import android.view.View.OnClickListener;
import android.widget.Button;
import android.widget.Toast;

public class MainActivity extends Activity {

	// a string we are going to use to name the app in the logs
	private static String logtag = "Simple App 8";

    @Override
    protected void onCreate(Bundle savedInstanceState) {
        super.onCreate(savedInstanceState);
        setContentView(R.layout.activity_main);

        // find your buttons
        Button startButton = (Button)findViewById(R.id.button_start);
        Button stopButton = (Button)findViewById(R.id.button_stop);

        // listen for clicks on the buttons
        startButton.setOnClickListener(startListener);
        stopButton.setOnClickListener(stopListener);
    }

    // create a new click listener known as "startListener"
    private OnClickListener startListener = new OnClickListener() {
    	// run a function called "onClick" and pass in a view object
    	public void onClick(View v) {
    		// log the button event
    		Log.d(logtag, "button clicked - start button");
    		// present a popup to the user with a message
    		Toast.makeText(MainActivity.this, "button clicked - start button", Toast.LENGTH_LONG).show();
    		// log the button end
    		Log.d(logtag, "button ended - start button");
    	}
    };

    // same thing as above except for the stopListener this time
    private OnClickListener stopListener = new OnClickListener() {
    	public void onClick(View v) {
    		Log.d(logtag, "button clicked - stop button");
    		Toast.makeText(MainActivity.this, "button clicked - stop button", Toast.LENGTH_LONG).show();
    		Log.d(logtag, "button ended - stop button");
    	}
    };

    @Override
    public boolean onCreateOptionsMenu(Menu menu) {
        // Inflate the menu; this adds items to the action bar if it is present.
        getMenuInflater().inflate(R.menu.main, menu);
        return true;
    }

    /**
     * Below are some helpful app wide event listeners to let you know when the app has reached
     * certain states, for instance when the user hits the home button, the app with pause. When the
     * user re-opens the app, you can look for "onResume" and take action like presenting a message
     * that says "Welcome Back!"
     */
    @Override
    protected void onStart() {
    	Log.d(logtag, "started");
    	super.onStart();
    }

    @Override
    protected void onResume() {
    	Log.d(logtag, "resumed");
    	super.onResume();
    }

    @Override
    protected void onPause() {
    	Log.d(logtag, "paused");
    	super.onPause();
    }

    @Override
    protected void onStop() {
    	Log.d(logtag, "stopped");
    	super.onStop();
    }

    @Override
    protected void onDestroy() {
    	Log.d(logtag, "destroy");
    	super.onDestroy();
    }

}

It looks like a lot, but it’s actually pretty simple. It’s just finding the buttons we defined earlier, setting some onClick events on them and displaying a message if a user clicks. The rest of the code are just some helpful functions to allow you to determine what the state the app is in and entering into so you can take whatever actions you please.

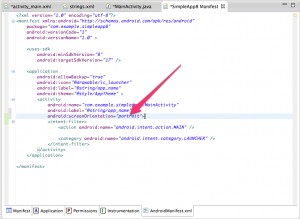
The last item is the tricky part. Let’s say we don’t want the app to rotate when a user turns their phone sideways. We need to modify APP_NAME –> AndroidManifest.xml. Let’s add:

android:screenOrientation="protrait"

To the activity element. Here’s a screenshot

Now we’ve locked the screen orientation to portrait.

That’s it for round 1. More to come. I got this post from here (http://blog.idleworx.com/2011/06/build-simple-android-app-2-button.html), I’m just mostly repeating this for my own sake.


Keyboard Shortcut to Launch Android App on Mac

Had some trouble launching apps on my phone automatically from android developer tools with a keyboard shortcut. Turns out there’s a two step process for doing this:

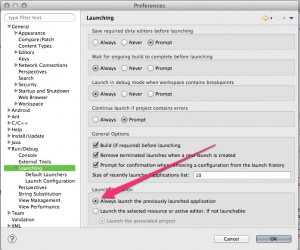
  1. In your preferences –> Run/Debug –> Launching set “Launch Operation” to “Always launch the previously launched application.”
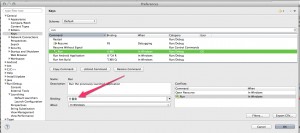
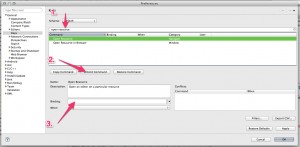
  2. In General –> Keys search for “run” and select the icon run element, set a keyboard shortcut (I used command + shift + R). Note, you will get a conflict with another default command.
  3. Now search for the conflict (mine was called “Open Resource”). Fix it by unbinding any commands.

Voila!


Using Remastersys For Bootable Custom ISOs

So you have an ubuntu image you want to save (say you just had to reinstall everything and do a custom setup and you don’t really want to go through all that again).

Follow this tutorial to get remastersys installed on ubuntu:

http://askubuntu.com/questions/133272/how-do-i-install-remastersys

Use it like this:

sudo remastersys clean
sudo remastersys dist

Then I copied the iso to a thumb drive, moved it to a mac computer and used dd to convert to a dmg and rewrite the usb to a live usb

It works!

Setting up Turtlebot Again

I’m just making personal notes here so I hope this helps but things may not be completely explained or make sense.

If you’re having problems with turtlebot connecting over USB it might be that permissions are setup wrong. You can check the permissions in:

/dev/ttyUSB0

you might have to change to chmod 666 or a+rw…but this wont be permanent. If you want a perm change, edit the /etc/udev/rules.d/ folder:

Add a file “80-turtlebot.rules” whatever number overrides everything else in the directory. Then add the following lines:

#serial usb
SUBSYSTEM=="usb", ATTRS{idProduct}=="6001", ATTRS{idVendor}=="0403", MODE="0666", GROUP="turtlebot"

You can get the product and vendor IDs by doing lsusb -v and looking at the which comes first, in regular lsusb its vendor:product.

Change the perms for any device you plug into your system, like the kinect and any turtlebot usb cords.

Restart and you should be good to go.


Burn Images To USB Thumbs From A Mac Like A Boss

This one goes out to all my homies who end up googling how to burn ISOs about once every year when they sufficiently screw a box and need a fresh reinstall. Here’s the process yo:

First off, I already wrote about this once for sd cards, if you are looking for that please look here: https://iwearshorts.com/blog/raspberry-pi-the-5-minute-setup/

If you are looking to burn a live usb drive here it is:

Let’s say we’ve downloaded an iso, but we need to convert it to an image. This can be done like this:

hdiutil convert -format UDRW -o ~/path/to/target.img ~/path/to/ubuntu.iso

Make sure and remove the .dmg at the end, god dammit mac…

Next make sure your usb thumb drive is NOT in your computer and run:

diskutil list

Now insert the thumb drive and run the same command again:

diskutil list

Find the difference. It’s usually something like “/dev/disk2”. Unmount the usb drive:

diskutil unmountDisk /dev/diskN

Now run dd on the shit (make sure you replace the parts of this command with your own information):

sudo dd if=/path/to/downloaded.img of=/dev/rdiskN bs=1m

Make sure you wait, dd won’t tell you of its progress so you will just have the wait. Now ejeculate the drive:

diskutil eject /dev/diskN

Boom!

Turtlebot Ethernet & Wireless Not Working Ubuntu

So here’s what I did on my turtlebot:

sudo apt-get update
sudo apt-get dist-upgrade
sudo reboot

My drivers stopped working. I couldn’t even get ethernet. Here’s a good set of what to do…

Open your network interfaces file:

pico /etc/network/interfaces

replace the contents with this:


Then download the ethernet driver (compat-wireless.tar.bz2) here (so you can atleast get a wired connection to the internets):

http://wireless.kernel.org/download/compat-wireless-2.6/

Save it to a usb drive and plug it into your turtlebot. Move the file to your home directory and do the following:

cd ~/
sudo apt-get update
sudo apt-get install build-essential
cd ~/Desktop
tar -xjvf compat-wireless-2.6.tar.bz2
cd compat-wireless*
scripts/driver-select atl1c
make
sudo make install

Once that’s done, you should restart your computer. With any luck your ethernet should just work. If it doesn’t do this:

sudo modprobe atl1c

Now that should do it. Reboot one more time:

sudo reboot

You should have an inteweb connection. Now you can update and grab the generic tools from the repository:

sudo apt-get update
sudo apt-get install linux-backports-modules-wireless-lucid-generic

Then on your GUI, go to System –> Administration –> Hardware Drivers and download the necessary driver for the wireless device.

Now you should have wireless activated.

Certain Images Not Loading in Flash Builder

Well if you’re anything like me right now, you’re at your wits end, you’ve given up and your browser any site you can find that says something about images/importing and adobe flash builder…

To no avail…

I just spent the last 3 hours (3:07 to be exact) trying to figure out what some images import into flash builder and some don’t. WTF? Turns out, there’s one more step you need to take with pngs and that was my problem. I’m using the following method to pack images into a swc:

In Adobe Flash Pro (Incomplete Procedure)

  1. (In adobe flash pro) File -> Import -> Import to stage. NOTE: This is missing one important step, read on…
  2. Right click the image -> Convert to symbol
  3. Name the Image something like “CallToAction”
  4. Check the “Export for ActionScript” and Export in frame 1 checkboxes
  5. Save
  6. File -> Publish Settings -> check the “SWC” checkbox -> Ok
  7. File -> Publish

In Adobe Flash Builder

  1. Right click the project or create a new project.
  2. Under “ActionScript Build Path” -> “Add SWC…”
  3. File -> Restart

Your code should look like the following assuming you named your symbol “CallToAction” and exported it for actionscript in flash pro:

package
{
	import flash.display.MovieClip;
	import flash.display.Sprite;

	public class webcam extends Sprite
	{
		public function webcam()
		{
			var drawing:MovieClip = new CallToAction() as MovieClip;
			addChild(drawing);
		}
	}
}

Now then…The hard part…

Make sure, I repeat, ahem….make sure if you are working with pngs, that after you have imported your image and before you convert it to a symbol, that you right click the image in the library, go to the properties tab, and then select the “Lossless” option under  “Compression”. So the process looks something like this:

In Adobe Flash Pro (Correct Procedure)

  1. File -> Import… -> Import to stage -> (select your file)
  2. (If your image is a png) Right click the image in your library window -> Properties… -> Compression -> (Select “Lossless”) -> Ok
  3. Right click the image -> Convert to symbol
  4. Name the image something like “CallToAction”
  5. Check the “Export for ActionScript” and “Export in frame 1” checkboxes
  6. Save
  7. File -> Publish Settings -> check the “SWC” checkbox -> Ok
  8. File -> Publish

Good resource here: http://www.htmlgoodies.com/beyond/webmaster/toolbox/article.php/3864136/Flash-Tutorial-How-to-Import-MovieClips-into-a-Flash-Builder-ActionScript-Project.htm and here: http://www.codeandvisual.com/2009/how-to-import-movieclips-into-a-flash-builder-actionscript-project/

Night

Cannot Redeclare Class in New XAMPP Install

I recently ran into a new error after I installed xampp for the first time on my new computer. Check it:

Cannot redeclare class 'Config' in /Applications/XAMPP/xamppfiles/lib/php/Config.php on line 44

Amazing.

This is happening because PHP doesn’t initially know where to look for your “config.php” file. I know I know, it’s a common name. Anyway, to fix this little gem, you need to edit your php.ini file.

Change the line in /Applications/XAMPP/etc/php.ini here:

;include_path = ".:/php/includes"

to:

include_path = ".:/php/includes"

NOTE: you may also need to change to something like this depending on your setup:

include_path = ".;.:/php/includes"

This should tell php to look in the current working directory before looking for its root path to a random config file.

Crazy town.

Beagle Bone Black – Getting Started

Let’s get right to it shall we?

If this is your first time, get a usb cord, plug into the beagle bone and plug into your laptop. Download the drivers for your computer in step #2 on this page. Then navigate to http://192.168.7.2. NOTE: you may need to restart your computer.

If you want to make something blink, click the “cloud 9 ide” link, and copy and paste some code from this page, make sure to hit the “run” button not the “debug” button at the top. Boom you pwn some leds.

Ok, you’re bored. Enough of this virtual shit, let’s get something we can develop with.

Adafruit has a good tutorial on how to write an image to an sd card from a mac. Go here, grab the latest version of angstrom. Follow the instructions from the aforementioned tutorial to write your sd card image. NOTE: if you get a permission denied error when trying to write the disk, it’s because the sd card reader fugged up. Apparently, apple made the macbook pro like nintendo, so what did you do when your games got messed up on nintendo? Take the game out and blow! Seriously, Jiggle the card around and blow. Thanks apple. Also, this will take a long time, so feel free to surf porn or whatever your do at work.

Now install angstrom on your beagle. Follow the tutorial about half way down the page here. should take about 45 minutes. Be sure you have a power supply that provides more than 1A as the bone can pull this much during installation.

Next get it running with wifi, follow the tutorial here: http://learn.adafruit.com/beaglebone/wifi

You might also find that you can’t find the bone on your network after you remove all your peripherals and just plug your wifi into the usb. This is most likely because you haven’t powered it.

If you want debian, there’s a great distro here: http://elinux.org/BeagleBoardDebian.

Cheetos Away!

How do you introduce new Cheetos that don’t look like Cheetos? By letting people play with them. We turned a TV commercial into a game on YouTube, where you can fling new Cheetos Mix-Ups snacks from your phone into a video playing on your desktop.

In order to pitch this idea to Cheetos in a way that would convey how fun it was to fling cheetos across the room, we built a prototype. It included connecting a smart phone to a desktop computer over websockets and running some pretty crude animations so simulate the look and feel of the original idea. The prototype was built within two weeks and the clients loved it.

 My Role

Production of the prototype and technical direction of the finished product.

Technologies

  • HTML5 mobile app
  • CSS3 animations on desktop
  • Websockets to connect the mobile device to the desktop