How to Install Node.js on Your Server

A quick guide for getting up and running with node js on your personal server.

Getting started…

If you don’t already have git installed on your server I suggest you refer to my earlier post on installation. We’ll be using git to grab node.js in this tutorial. You also must have root or shell exec access in order to execute an installation, if you don’t have ssh or command line access to your server, check with your hosting provider.

Installation…

Change to your temporary directory…

cd /var/tmp

Tell git to grab the latest installation of node js…

git clone git://github.com/joyent/node.git

Now change to the new directory of node…

cd node

Configure the installation…

./configure

Make the makefile…

make

Install node…

make install

Double check node was installed correctly by typing this command…

node --version

If everything was set up correctly you should get a return in the command line with the latest version of node installed on your server.

Running the server…

Now that you have node installed, let’s get a quick hello world up so we can make sure everything is configured properly and start experiementing with node!

Let’s assume you want to run a server available from http://yourdomain.com/. Change to your domain’s home directory…

cd /home/mydomain/public_html

Now create a file in here that will be our node server. When run from the command line, this file will tell node to listen on whatever port you designate. When it gets a hit, it will send an output that we specify.

Create a file named node_test.js…

var http = require('http');
http.createServer(function (req, res) {
  res.writeHead(200, {'Content-Type': 'text/plain'});
  res.end('Hello World!n');
}).listen(8080);
console.log('Server running at http://mydomain.com:8080/');

Save this file in your domain’s directory.

Then run it in the command line…

node /home/mydomain/public_html/node_test.js

You can also set the process to run indefinetely on your server by running the command with an “&” symbol at the end…

node /home/mydomain/public_html/node_test.js&

You should get a response that looks like this…

In your browser type in “http://yourdomain.com:8080/” and you should see the response from node that we entered in above! If everything is configured properly, your node process should be running in the command line and listening on port 8080 for any connections, when it gets hit, it will output our message!

How to Install Git on your server

A quick tutorial on installing Git on your server in order to download packages directly from github like Node.js.

First make sure you don’t have Git already installed.

git --help

If something other than an error pops up in the command line, then you already have it installed! Otherwise read on…

Installation…

(Keep in mind, I’m writing this tutorial for people using CentOS distros and other red hat based operating systems. This means I have no package installer like yum or apt-get)

Change to the temporary directory on your server where you wish to install something. Log in as root and…

cd /var/tmp

Now download the file…

wget http://kernel.org/pub/software/scm/git/git-1.7.4.4.tar.gz

Now unpack it…

tar -zxf git-1.7.4.4.tar.gz

Change to the new directory…

cd git-1.7.4.4

Configure for installation…

./configure

Make the install…

make

Install Git…

make install

Now test to make sure it installed properly…

git --help

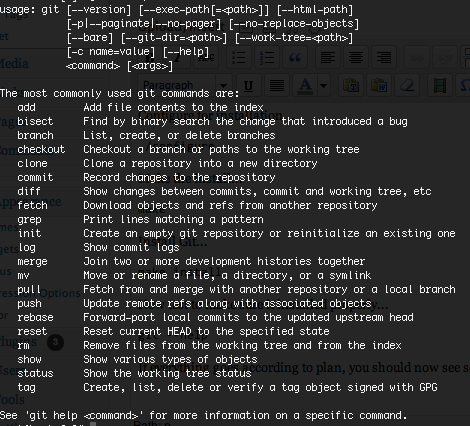
If everything goes according to plan, you should now see something like the screenshot below appear.

Kinect Hacking with Schiffman – Part 1

In this tutorial you’ll find out how to:

  1. Install processing on your mac.
  2. Install a library to use with our X-Box Kinect.
  3. Run some example programs to start playing with the Kinect’s output.

The goal is to keep this tutorial as simple as possible.

Requirements…

You’ll need:

  • Microsoft XBox kinect with a wall unit power adapter with usb connection.
  • Unix based operating system (if your running windows, then you’ll have to run a virtual machine – try a live cd with your favorite linux distro)
  • Processing Language Installation (don’t worry if you don’t have it yet, well get to that)
  • Schiffman Kinect Library (Again, if you don’t have it, read on)

Getting Started…

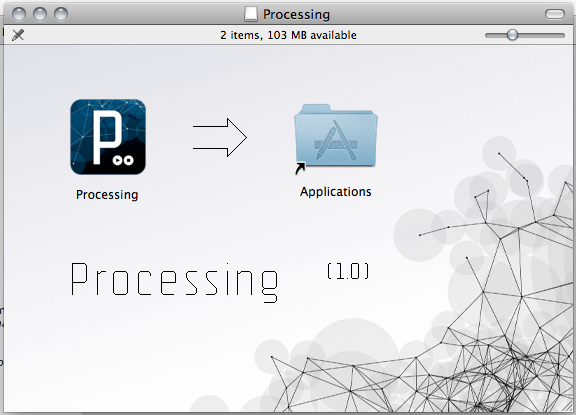
First we’ll need the processing language. Go to http://processing.org/download/ and click on the install for your operating system. Install it like a regular application. Once installed processing works by running a custom editor where you can write new scripts or run example scripts. If you’re on a mac running apple’s OS then you can expect processing to automatically create a folder called “Processing” in your user’s “Documents” folder. Inside the “Processing” folder there should be two other folder labeled “sketches” and “library.” The “sketches” folder is where you’ll store all of your custom projects. The “library” folder is where you’ll store all the libraries you download and subsequently where we’ll store our schiffman library for the Kinect.

Getting Schiffman…

Now that you have processing installed it’s time to get the schiffman library. Let’s grab the latest distribution here: https://github.com/shiffman/libfreenect/tree/master/wrappers/java/processing/distribution

Once you’ve downloaded the master branch, unzip it and navigate to “wrappers” -> “java” -> “processing” -> “distribution” -> “openkinect”. Grab “openkinect” and drag it into your “Documents” -> “Processing” -> “libraries” folder. That’s it! Processing automatically knows where to look when it looks for libraries so you just need to include it with your scripts in order to make it run!

Connecting the Kinect…

Now that we have processing and our library it’s time to hook up the kinect and get started hacking! Simply plug in your kinect to any USB port and navigate to “Documents” -> “Processing” -> “libraries” -> “openkinect” -> “examples”, inside this directory are 4 (at the current schiffman library version) examples to chooose from. Simply click into one of the example folders and double click the “filename.pde” to run it in processing. You can also right click and “open with” then choose processing.

Running a script…

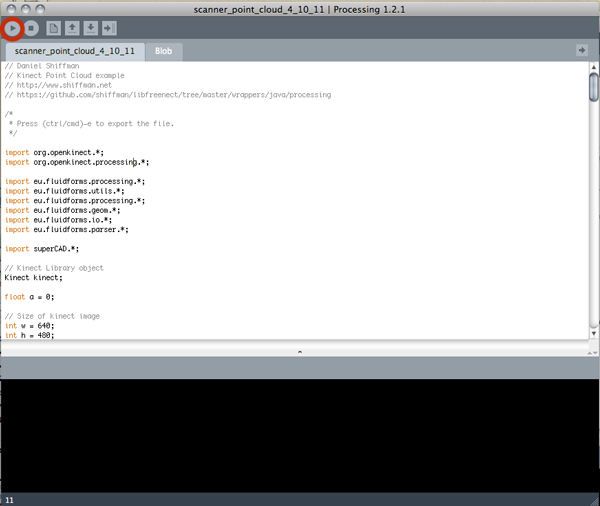
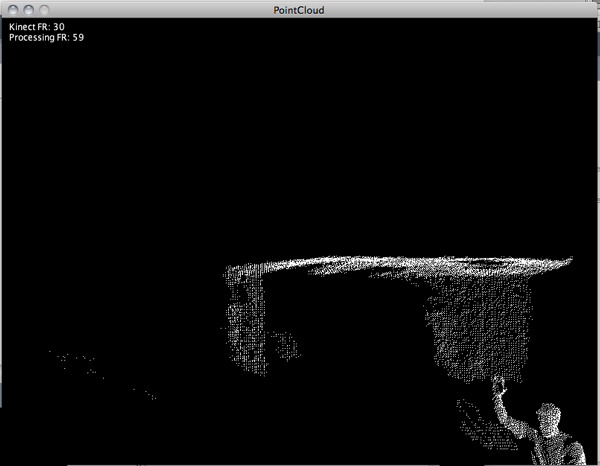
Processing interprets code at run time so as soon as you press the “play” button at the top left hand of the processing environment it will either compile the script or let you know you have an error. When you run the script you should see a small window appear. If you run one of the example scripts, you should see a window with live data from the Kinect. I chose to run the “Point Cloud” script.

You can see that it’s working and a point cloud of depth data is appearing on the screen. From here we can copy and paste this code into a new script. Rename and save your new script in “Documents” -> “Processing” -> “sketches” and your free to start making changes to the script itself. Don’t be afraid to mess things up, you can simply copy from the examples and start over if you do!

Up next…

In the second part of this series we’ll talk about modifying some of these scripts to do certain things. In the end we’ll end up using our XBox Kinect as a 3D scanner that can output an .stl file made for a 3D printer. This will allow us to scan things and print them in 3D! Stay tuned.

How to SSH to Your Server

Getting started…

You must have shell access available on your server. If you don’t know, you can always check the administration panel of your hosting to find out. Many hosting providers use something called “cPanel” to manage their backends, they will often change styles but the icons will look the same. Look for something that looks like this:

If you have shell access enabled on your account you should be either able to view the access credentials by clicking on this icon, or set them up.

Things you should know…

Having shell access available is sometimes dangerous, especially if your don’t use authentication keys. I have set up ssh keys on my server and only allow ssh keyed connections, this way you can’t just try to guess a password…you must have a keyed pair in order to make a connection. However, for the scope of this tutorial, I’ll simply explain how SSH to your server using the password credentials you set up in the last section.

Connecting…

Now that you have shell access set up, it’s time to connect. If you don’t know your server’s IP address you can look up your domain at: http://www.intodns.com/ which will provide information about your hosting provider and should present your server’s IP address if it’s available. If it’s not listed here, you must log into your hosting account and find it there.

If your on a mac the ssh connection command looks like this:

ssh username@111.222.333.444 -p1234

Just replace the username with your ssh login credential, the IP address numbers with your server’s IP and “-p1234” with the port number your ssh access is allowed on (usually this is run out of port 22, you should change this if you can as everyone knows that’s the standard port for ssh access).

If your on a windows machine, the process is a little harder. First you need to download an ssh client like PuTTY.

How to use PuTTY.

I’ve found in the long run, using PuTTY on Windows is actually faster and more convenient than using a mac to connect via SSH.

DIY – Smart Home: Part 1

I’ll be doing a series on smartifying your house. What better way to start this series that with the most important device in man’s modern history, the toilet? Then we’ll take a look generally at the bathroom and see what else we can wire up in order to provide ourselves with some interesting albeit funny data. After conquering the bathroom, we’ll move on to something a little more complex, the kitchen. Finally, we’ll cap the series off with something that everyone with a smartphone should be able to do…check the garage door! We’ll also get into a little iphone development and program an app that will allow us to close the garage door remotely! But first, the toilet…

The idea…

Back when twitter was still learning to fly, I thought it would be funny to make a toilet tweet. I also thought it would be interesting to know how many times a day I use the toilet and how many gallons of water I was using. So I build a simple device to keep track. However, it wasn’t very useful or reliable and with Twitter’s adoption of oAuth Authentication, my feed went the way of the buffalo. Let’s revisit the idea and make some modest improvements in order to get some more information about our bathroom habits and have some fun tweeting about it in the process.

Getting started…

First off, we’ll need to know the basics. We’ll be using an ultrasonic range finder hooked up to an ethernet enabled arduino. We’ll also do some serverside programming in order to monitor out toilet and ultimately tweet every time we use our toilet. The rangefinder will act as a detection sensor and also provide us some useful information about the person’s position when they use the toilet, without the privacy invasion of a camera.

Materials…

  • ultrasonic rangefinder from parallax (available at radio shack)
  • Arduino
  • Ethernet shield
  • copper wire
  • led
  • bread board
  • server hosting / LAMP enabled

Wiring…

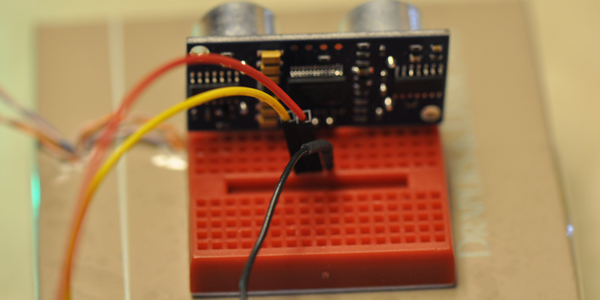
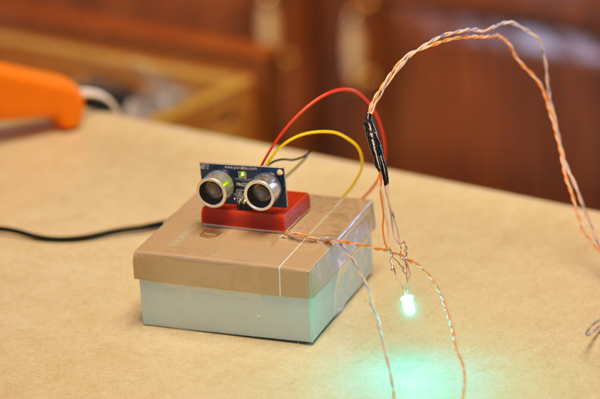
The first step is to hook everything up and begin running a test program to make sure everything is set up properly. We’ll start by attaching the range finder to our toilet:

Next, we’ll run the wires from the range finder to the arduino/ethernet module hooked up wherever it’s conventient:

Finally, we’ll run power to the arduino and upload the example program for range finders provided with the arduino software package:

Once we’re able to output some serial data that shows we are taking accurate measurements, it’s time to modify code…

Coding…

We need to modify this example program a bit to include the ethernet shield and to notify an address on our server as soon as we’ve tripped our sensor. We’ll start by importing some libraries and getting our setup function working:

#include 
#include 

// Enter a MAC address and IP address for your controller below.
// The IP address will be dependent on your local network:
byte mac[] = {  0x99, 0xA9, 0xDA, 0x00, 0x99, 0x99 };
byte ip[] = { 192,168,1,177 };
//byte server[] = { 173,194,33,104 }; // Google
byte server[] = { 11,222,33,44 }; // your server IP address

// Initialize the Ethernet client library
// with the IP address and port of the server 
// that you want to connect to (port 80 is default for HTTP):
Client client(server, 80);

long inches = 11;

void setup() {

// sonar pins
//pinMode(13, OUTPUT); // blue
//pinMode(12, OUTPUT); // green

// reset pin
pinMode(9, OUTPUT); // resest
pinMode(7, OUTPUT); // ping pin

// start the Ethernet connection:
  Ethernet.begin(mac, ip);
  // start the serial library:
  Serial.begin(9600);
  
  //digitalWrite(9, LOW);

}

void loop()
{
  Serial.println("pinging...");
  // send a sonar ping
  pingSonar();
}

Next we’ll add some custom functions:

void pingSonar() {
  // establish variables for duration of the ping, 
  // and the distance result in inches and centimeters:
  long duration, inches, cm;
  
  const int pingPin = 7;

  // The PING))) is triggered by a HIGH pulse of 2 or more microseconds.
  // Give a short LOW pulse beforehand to ensure a clean HIGH pulse:
  pinMode(pingPin, OUTPUT);
  digitalWrite(pingPin, LOW);
  delayMicroseconds(2);
  digitalWrite(pingPin, HIGH);
  delayMicroseconds(5);
  digitalWrite(pingPin, LOW);

  // The same pin is used to read the signal from the PING))): a HIGH
  // pulse whose duration is the time (in microseconds) from the sending
  // of the ping to the reception of its echo off of an object.
  pinMode(pingPin, INPUT);
  duration = pulseIn(pingPin, HIGH);

  // convert the time into a distance
  inches = microsecondsToInches(duration);
  
  String inchesStr = inches;
  
  Serial.println("ping returned: "+ inchesStr +"...");
  
  // show LED colors
  if(inches < 30 ) {
    // then the person is sitting
     callServer(inchesStr, "sonar");
     responseLoop();
     //delay(120000);
  } else {
    // do nothing...
  }
  //cm = microsecondsToCentimeters(duration);
  
  //Serial.print(inches);
  //Serial.print("in, ");
  //Serial.print(cm);
  //Serial.print("cm");
  Serial.println();
  delay(3000);
}

void responseLoop () {
  for(int i = 0; i < 1200; i++) {
       // delay the timer
                        // BEGIN IF STATEMENTS FROM LOOP
                          
                        // if there are incoming bytes available 
                        // from the server, read them and print them:
                        if (client.available()) {
                          //while(client.available()) {
                            char c = client.read();
                            Serial.print(c);
                          //}
                          //delay(120000);
                        }
     delay(1);
        
   } // end for loop
                      
    // if the server's disconnected, stop the client:
    if (!client.connected()) {
      Serial.println();
      Serial.println("disconnecting.");
      client.stop();
      //i = 120000;
      //digitalWrite(9, LOW);
      //delay(120000);
      // do nothing forevermore:
      
      delay(560000);
       
    }
      // END IF STATEMENTS FROM LOOP
        
}

void callServer (String inchesStr, String type) {
  // reset pin nine
  /*digitalWrite(9, HIGH);
  delay(100);
  digitalWrite(9, LOW);
  delay(100);
  digitalWrite(9, HIGH);*/
  // define some vars
  
  String str = "http://example.com/path_to/process.php?measurement="+ inchesStr +"&type=" + type;
  
   
  // give the Ethernet shield a second to initialize:
  delay(1000);
  Serial.println("connecting...");

  // if you get a connection, report back via serial:
  if (client.connect()) {
    Serial.println("connected");
    Serial.println("Calling: "+ str);
    
    // Make a HTTP request:
    client.println("GET "+ str +" HTTP/1.0");
    client.println();
    
    
  } 
  else {
    // kf you didn't get a connection to the server:
    Serial.println("connection failed:" + str);
    //digitalWrite(9, LOW);
    //callServer(inchesStr, type);
    //delay(120000);
  } 
  
  
}

long microsecondsToInches(long microseconds)
{
  // According to Parallax's datasheet for the PING))), there are
  // 73.746 microseconds per inch (i.e. sound travels at 1130 feet per
  // second).  This gives the distance travelled by the ping, outbound
  // and return, so we divide by 2 to get the distance of the obstacle.
  // See: http://www.parallax.com/dl/docs/prod/acc/28015-PING-v1.3.pdf
  return microseconds / 74 / 2;
}

long microsecondsToCentimeters(long microseconds)
{
  // The speed of sound is 340 m/s or 29 microseconds per centimeter.
  // The ping travels out and back, so to find the distance of the
  // object we take half of the distance travelled.
  return microseconds / 29 / 2;
}

After we're done with our arduino, we'll need to create a script that will collect information about our toilet usages and also notify twitter when we're using it. We'll also need to set up a database where we can store this information. Let's create the database now:

CREATE TABLE IF NOT EXISTS `readings` (
  `id` int(11) NOT NULL auto_increment,
  `measurement` varchar(255) NOT NULL,
  `sensor_type` varchar(255) NOT NULL,
  `time` timestamp NOT NULL default CURRENT_TIMESTAMP on update CURRENT_TIMESTAMP,
  PRIMARY KEY  (`id`)
) ENGINE=MyISAM  DEFAULT CHARSET=latin1 AUTO_INCREMENT=96 ;

Now let's create a script that will search for a $_GET request and update the database and twitter when it receives the proper information:

<?php
/*
	Written By: Mike Newell
	mike@iwearshorts.com
	https://iwearshorts.com/
	
	No license - Feel free to copy!
*/
if(isset($_GET['measurement'])) {
	require_once('lib/db.php');
	require_once('lib/TwitPic.php');
	$inches = intval($_GET['measurement']);
	
	if($inches < 16) {
		$activity = "sitting";
		$searchStr = "sitting+on+toilet";
	} else {
		$activity = "standing";
		$searchStr = "standing+at+urinal";
	}
	
    /*
    	GET CONTENTS OF TOILETS DIRECTORY
    */
    if ($handle = opendir('./toilets')) {
	    echo "Directory handle: $handlen";
	    echo "Files:n";
		$images = array();
	    /* This is the correct way to loop over the directory. */
	    while (false !== ($file = readdir($handle))) {
	        //echo "$filen";
	        $images[] = $file;
	    }
	
	    closedir($handle);
	}
	
	// select a random image
	$count = count($images);
	
	for($i = 0; $i < $count; $i++) {
		$imageNum = mt_rand(1, $count);
		
		$selectedImageSrc = $images[$imageNum];
	}
	
	echo 'toilets/'.$selectedImageSrc;
    
    
    /*
    NEW TWITPIC API
	 * All of this info is needed only for API calls that
	 * require authentication. However, if the API call doesn't
	 * require authentication and you provide the information anyways,
	 * it won't make a difference.
	 */
	$api_key = ""; // your TwitPic API key (http://dev.twitpic.com/apps)
	$consumer_key = ""; // your Twitter application consumer key
	$consumer_secret = ""; // your Twitter application consumer secret
	$oauth_token = ""; // the user's OAuth token (retrieved after they log into Twitter and auth there)
	$oauth_secret = ""; // the user's OAuth secret (also from Twitter login)
	
	/*
	 * The TwitPic() constructor can be left blank if only
	 * doing non-auth'd API calls
	 */
	$twitpic = new TwitPic($api_key, $consumer_key, $consumer_secret, $oauth_token, $oauth_secret);
	
	try {
		/*
	  * Uploads an image to TwitPic AND posts a tweet
	  * to Twitter.
	  *
	  * NOTE: this still uses v2 of the TwitPic API. This means that the code makes 2 separate
	  * requests: one to TwitPic for the image, and one to Twitter for the tweet. Because of this,
	  * understand this call may take a bit longer than simply uploading the image.
	  */
	  $resp = $twitpic->uploadAndPost(array('media'=>'toilets/'.$selectedImageSrc, 'message'=>"Someone is ".$activity." at Mike's toilet right now!"));
	  print_r($resp);
	} catch(TwitPicAPIException $e) {
		echo $e->getMessage();
	}
    
    
	//$connection->post('statuses/update', array('status' => "Guess the activity! Someone is using Mike's toilet "));
	// set the values to variables
	$measurement = $_GET['measurement'];
	$type = $_GET['type'];
	// store the value in a database
	$db = new DBconnect("localhost", "user_name", "password", "database_name");
	$result = $db->query("INSERT INTO readings (measurement, sensor_type) VALUES ('$measurement', '$type')");
	if($result) {
		echo "successful.";
	} else {
		echo "unsuccessful input.";
	}
} else {
	echo "get request with measurement not present";
}
?>

We also need a twitter class that will handle pictures. I chose to use twitpic, you can download the library here.

We'll also need a small database class to manage input and output from our database. Download the demo at the bottom of the page to get it.

Once we've properly initialized everything, it's just a matter of getting the proper api keys from twit pic and twitter. Make sure to enter your database connection information into the new class, modify the arduino code with your server's specific IP address and path to the process.php file wherever you decide to store it on your server. You'll also need to make sure and have HTTP_OAuth and HTTP_Request2 installed on your server.

Download the demo!
Reverse Parallax Effect

Getting started…

This demo requires the use of javascript so please consider your users before implementing this in a professional setting. I haven’t included any graceful degradation, please have a backup plan if the parallax effect is required.

First…

We need to setup a page structure:


<!DOCTYPE html PUBLIC "-//W3C//DTD XHTML 1.0 Transitional//EN" "http://www.w3.org/TR/xhtml1/DTD/xhtml1-transitional.dtd"> 
<html xmlns="http://www.w3.org/1999/xhtml">
<head> 
 
Parallax Background with Javascript and CSS 


</head> 
<body id='background'> 
    
<h1>Parallax Background</h1>

Written by Mike Newell

<h2>Scroll left and right to see the effect</h2>
</body> </html>

This page structure is simple. We include the jquery library from google so users will most likely already have it cached in their browsers. Then we include the stylesheet that will load background images. Finally, we setup a page with some elements inside a container. We’ll write in a script that will grab these elements and make them mobile in the last portion of this tutorial.

Next…

We’ll include a css file to provide a psuedo parallax effect with two background images.

/* 
    Document   : style
    Created on : Apr 3, 2011, 8:28:49 PM
    Author     : Mike Newell
    Description:
        Parallax effect with css background images and elements.
*/
body {
	background-color: white;
	margin: 0;
	padding: 0;
	font-family: "Trebuchet MS", Verdana, Helvetica, Arial, sans-serif;
        background-image: url(../images/bg.gif);
	background-repeat: repeat;
	background-attachment: fixed;
}
#parallax {
	background-image: url(../images/midground.png);
	background-repeat: repeat;
	background-attachment: fixed;
	padding: 5em 0;
        height: 900px;
}
* html #parallax {
	/* because IE6 can't do transparent PNGs for backgrounds */
	background-image: url(../images/midground.png);	
}

#wrap {
    width: 3000px;
}

#content {
    padding: 20px;
    z-index: 999;
    background: black;
    -moz-opacity:0.5;
    opacity: 0.5;
    color: white;
    -moz-border-radius: 250px;
    border-radius: 250px;
    width: 350px;
    height: 260px;
    top: 50%;
    margin-top: -150px;
    position: fixed;
    left: 50%;
    margin-left: -150px;
    padding-top: 90px;
    text-align: center;
}

/*
    GENTEST
*/
.mover {
    z-index: 998;
    background: greenyellow;
    color: white;
    -moz-border-radius: 100px;
    border-radius: 100px;
    position: absolute;
    text-align: center;
}

The base background image is loaded on the body and scrolls with the user scroll on the page. The second background image is a png and overlays the body. This image is loaded in the page #wrap div and moves a bit faster than the underlayer, giving the impression of a parallax. We also style a top layer in a circular div to have some text on the page.

Finally…

We write out a script to grab all the elements with a class of “genTest”.

/*
 *  Written By: Mike Newell
 *  Mike@iwearshorts.com
 *  https://iwearshorts.com/
 *  
 *  No license - Feel free to copy.
 *  
 */
$(window).load(function () {

    var layers = $('.mover').get();
    var layersCount = layers.length;
    var master = [];
    for(var i = 0; i < layersCount; i++) {
       master[i] = {
           speed : 1 - (i / layersCount),
           pos : $(layers[i]).position()
       }

    }

    var top;
    var left;
    var winWidth;
    var docWidth;
    var winHeight;
    var percentLeft;
    var percentTop;
    var absPercent;

    winHeight = $(window).height();
    winWidth = $(window).width();
    docWidth = $(document).width();
    absPercent = (winWidth / docWidth);

   $(window).scroll(function () {

       top = $(this).scrollTop();
       left = $(this).scrollLeft();

       for(var t = 0; t < layersCount; t++) {
           percentLeft = (left / winWidth) * master[t].speed;
           percentTop = (top / winHeight) * master[t].speed;

           var newPositionLeft = master[t].pos.left - (percentLeft * master[t].pos.left);
           var newPositionTop = master[t].pos.top - (percentTop * master[t].pos.top);


           $(layers[t]).css({"left":newPositionLeft, "top":newPositionTop});

       }
   }); 
});

This script grabs all the elements in order and designates a "speed" for each element. Then moves each element according to a percentage based off that speed and the user scroll amount. I deliberately programmed it this way in order to allow user scrolling with mouse wheels and two finger scrolling for mac users. It also works on smartphones, #mobile.

View the Demo. Download the Source.

Inspiration...

Recently I've been building a parallax style website inspired by the lallapalooza site. I had to develop my own little script to move elements based dynamically on how many elements on the page there are. Since we don't have content yet, I won't be able to hard code anything so elements with a certain class must be dynamically included.

Simple HTML DOM PHP

For those of us who wonder about things like whether or not there is a dom manipulation library that could easily select elements from a page captured from a cURL script with jQuery style selectors…

Simple HTML DOM Library.

I needed this for a project recently where I had to grab dynamic elements from other sites and then capture only bits and pieces from the pages. This library saved my life. If you’re interested, check out the project here.

Business Cards for SXSW

For SXSW I wanted to do something memorable with my business cards, something that would separate me from my peers and entice potential employers to actually visit my website!

The plan…

A bunch of students here at BDW decided to go analog and create business cards by hand using an old printing press. I began documenting the process of creating a business card and came up with the idea to film every business card I made and have a custom video produced for each business card. That was people could go to my website and see their individual business card being made.

The process only lasted for about 16 cards before I got bored and stopped filming. But I did manage to produce 16 videos! Below is a list of links to each individual business card! If your a recruiter, please check out the rest of my site while your here!

  • https://iwearshorts.com/business-cards/business-card-16/
  • https://iwearshorts.com/business-cards/business-card-15/
  • https://iwearshorts.com/business-cards/business-card-14/
  • https://iwearshorts.com/business-cards/business-card-13/
  • https://iwearshorts.com/business-cards/business-card-12/
  • https://iwearshorts.com/business-cards/business-card-11/
  • https://iwearshorts.com/business-cards/business-card-10/
  • https://iwearshorts.com/business-cards/business-card-9/
  • https://iwearshorts.com/business-cards/business-card-8/
  • https://iwearshorts.com/business-cards/business-card-7/
  • https://iwearshorts.com/business-cards/business-card-6/
  • https://iwearshorts.com/business-cards/business-card-5/

Red Dirt Collective

The Project:

Boulder Digital Works is teaming up with Nile Southern and Open Road media to revive Terry Southern’s career. We initially intended to build an interactive environment online where users could weigh in on how Terry has affected their lives, give commentary and submit Terry-inspired content. However, as most things do, plans have changed and we’ve taken a new direction with the Terry Southern brand. This site is due for an upgrade and was intended to be the first iteration of the interactive environment.

The Tech:

PHP, HTML5, CSS, JS. We also used Facebook comments and like buttons.

My Role:

Developer/Project Lead

A semi-working version currently exists here.

DIY Parking Sensor Tutorial

The last time I was home visiting my parents I noticed bumper imprints caused by my mother suburban on the stairs leading up from the garage. Their garage it turns out is just barely long enough to fit their gigantic vehicles. So I decided it would be nice to have some visual cue for parking. Out came the arduino and a sonar range finder from Radio Shack and the result was this tutorial.

Materials…

  • Arduino (I had a duemilanove available)
  • Ultrasonic Range Finder
  • Wire
  • Small box
  • 9V power supply (You can find old power supplies for cheap at thrift stores)
  • Tri Color LED
  • Hot Glue Gun
  • Breadboard

Assembly…

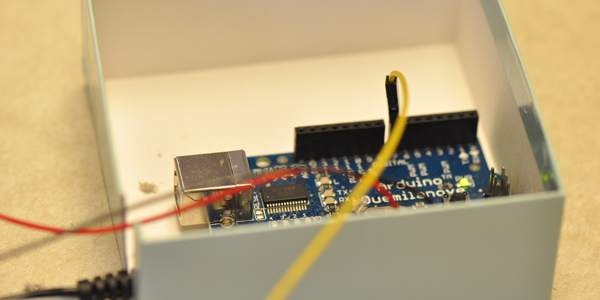
  1. Hot glue the arduino to the bottom of the box and run the power supple to it
  2. Connect the 5V and Ground wires to the range finder.
  3. Connect the Pulse cable from the range finder to a “PWM” input on the arduino (this is necessary because we’ll be sending pulses through the same leed that we listen for a return on). I used digital pin 7 with PWM for the pulse connection.
  4. Test the tri color LED to find out which connectors make which colors. You will need to keep track of which wire creates which colors and connect them to three digital pins on the arduino. Keep track of the pin numbers. For instance, I connected to digital pins 11, 12 and 13 with red, green and blue respectively.
  5. Once you have everything connected we’ll start writing the program. After your finished with the programming and you’re sure it works, it’s a good idea to seal everything up in the box to make sure none of the wires get disconnected before you mount the sensor to your wall.

Programming…

Luckily, Arduino already provides an example of how to use the pulse sonar sensor. Select the File -> Examples -> Sensors -> Ping example in the Arduino programming kit. Once open, select the code and copy it to a blank sketch. Save the new project under sketches I used the name “parking Example”.

Now we have something to work with. Begin customizing the code. First, we are only going to be measuring inches, not cm so lets comment out the code snippet about halfway down that runs a function to calculate cm. Comment out:

//cm = microsecondsToCentimeters(duration);

Next we don’t need to send sonar pings out at such a high interval. We only need to ping about every second because the car will (hopefully) be moving slowly into the garage. So at the bottom of the loop function set the delay to 1000:

delay(1000);

Next we need to tell arduino which pins we’ll be using for our LED output. At the top where we have:

const int pingPin = 7;

We’ll add:

pinMode(13, OUTPUT); // blue
pinMode(12, OUTPUT); // green
pinMode(11, OUTPUT); // red

Now that ardiuno has a setup for those pins, we’ll need to send a signal whenever we want that color to show. So After receiving the signal from our ping, we’ll compute the distance and if it falls within certain ranges we’ll show a specific color. I want the driver to see green until they get within 24 inches of the wall, at that point, I want the light to turn blue, signaling that they are getting closer. Then when they are within 6 inches of the wall, the red light should turn on, indicating to the driver that they should stop.

Include the following code below the inches distance calculation:

inches = microsecondsToInches(duration);
// show LED colors
  if(inches > 0 && inches <= 6) {
    // show red, all other leds are off
    digitalWrite(13, LOW);
    digitalWrite(12, LOW);
    digitalWrite(11, HIGH);
  } else if(inches <= 24 && inches > 6) {
    // show blue, all other leds are off
    digitalWrite(12, LOW);
    digitalWrite(11, LOW);
    digitalWrite(13, HIGH);
  } else {
    // show green led, all other leds are off
    digitalWrite(13, LOW);
    digitalWrite(11, LOW);
    digitalWrite(12, HIGH);
  }

This code tells arduino to send a signal to a specific pin when an object comes within a certain distance. The entire script should look like:

/* Ping))) Sensor
  
   This sketch reads a PING))) ultrasonic rangefinder and returns the
   distance to the closest object in range. To do this, it sends a pulse
   to the sensor to initiate a reading, then listens for a pulse 
   to return.  The length of the returning pulse is proportional to 
   the distance of the object from the sensor.
     
   The circuit:
	* +V connection of the PING))) attached to +5V
	* GND connection of the PING))) attached to ground
	* SIG connection of the PING))) attached to digital pin 7

   http://www.arduino.cc/en/Tutorial/Ping
   
   created 3 Nov 2008
   by David A. Mellis
   modified 30 Jun 2009
   by Tom Igoe
 
   This example code is in the public domain.

 */

// this constant won't change.  It's the pin number
// of the sensor's output:
pinMode(13, OUTPUT); // blue
pinMode(12, OUTPUT); // green
pinMode(11, OUTPUT); // red
const int pingPin = 7;

void setup() {
  // initialize serial communication:
  Serial.begin(9600);
}

void loop()
{
  // establish variables for duration of the ping, 
  // and the distance result in inches and centimeters:
  long duration, inches, cm;

  // The PING))) is triggered by a HIGH pulse of 2 or more microseconds.
  // Give a short LOW pulse beforehand to ensure a clean HIGH pulse:
  pinMode(pingPin, OUTPUT);
  digitalWrite(pingPin, LOW);
  delayMicroseconds(2);
  digitalWrite(pingPin, HIGH);
  delayMicroseconds(5);
  digitalWrite(pingPin, LOW);

  // The same pin is used to read the signal from the PING))): a HIGH
  // pulse whose duration is the time (in microseconds) from the sending
  // of the ping to the reception of its echo off of an object.
  pinMode(pingPin, INPUT);
  duration = pulseIn(pingPin, HIGH);

  // convert the time into a distance
  inches = microsecondsToInches(duration);
  // show LED colors
  if(inches > 0 && inches <= 6) {
    // show red, all other leds are off
    digitalWrite(13, LOW);
    digitalWrite(12, LOW);
    digitalWrite(11, HIGH);
  } else if(inches <= 24 && inches > 6) {
    // show blue, all other leds are off
    digitalWrite(12, LOW);
    digitalWrite(11, LOW);
    digitalWrite(13, HIGH);
  } else {
    // show green led, all other leds are off
    digitalWrite(13, LOW);
    digitalWrite(11, LOW);
    digitalWrite(12, HIGH);
  }
  //cm = microsecondsToCentimeters(duration);
  
  Serial.print(inches);
  Serial.print("in, ");
  Serial.print(cm);
  Serial.print("cm");
  Serial.println();
  
  delay(1000);
}

long microsecondsToInches(long microseconds)
{
  // According to Parallax's datasheet for the PING))), there are
  // 73.746 microseconds per inch (i.e. sound travels at 1130 feet per
  // second).  This gives the distance travelled by the ping, outbound
  // and return, so we divide by 2 to get the distance of the obstacle.
  // See: http://www.parallax.com/dl/docs/prod/acc/28015-PING-v1.3.pdf
  return microseconds / 74 / 2;
}

long microsecondsToCentimeters(long microseconds)
{
  // The speed of sound is 340 m/s or 29 microseconds per centimeter.
  // The ping travels out and back, so to find the distance of the
  // object we take half of the distance travelled.
  return microseconds / 29 / 2;
}

All that’s needed after that is upload the code to your arduino, mount the device to the front wall of your garage and hang the led somewhere where the driver can see it! Let me know how these instructions work for you. I can always adjust this tutorial later.