How to Wire/Control a Relay with Arduino or Raspberry Pi

Let’s say you want to control a light/air pump/device from a microcontroller or raspberry pi…

We’re assuming the device in question is one that can easily be controlled simply by turning the power on and off.

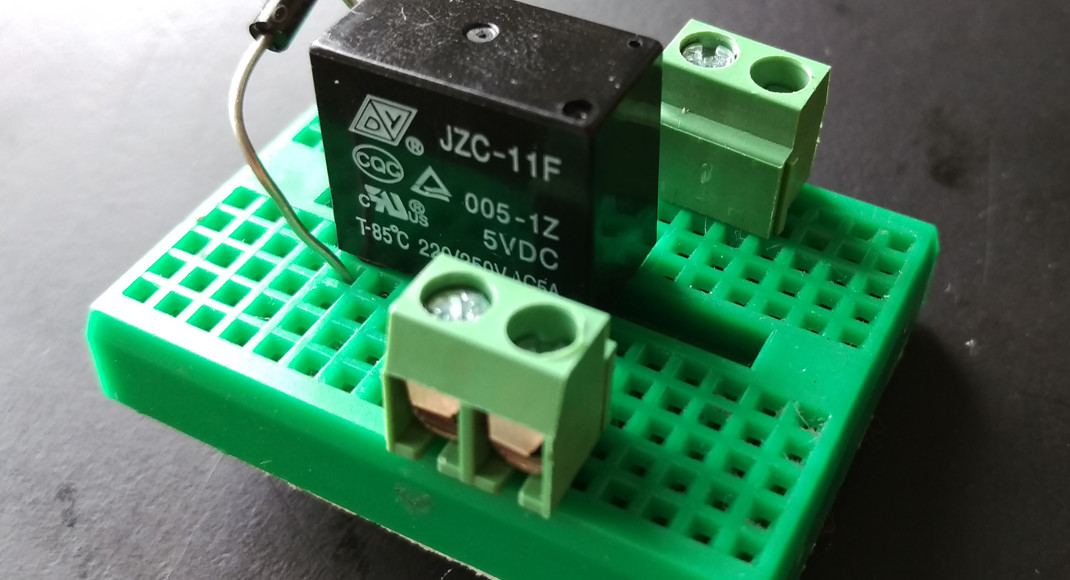
You can use a relay. Basically these things are physical switches mounted inside a block with a small inductive coil next to it. When you push 5V through the coil, it creates a large enough magnetic field to pull the switch from one state to the other (on to off and vice versa). You just need to make sure the relay you’re using is rated for the voltage/current you’ll be pushing.

In my case, I wanted to push 120V at no more than 5 Amps through the relay to an air pump that would switch on and off depending on my arduino. I bought a JZC-11F relay and went to work, below is a wiring diagram:

relay

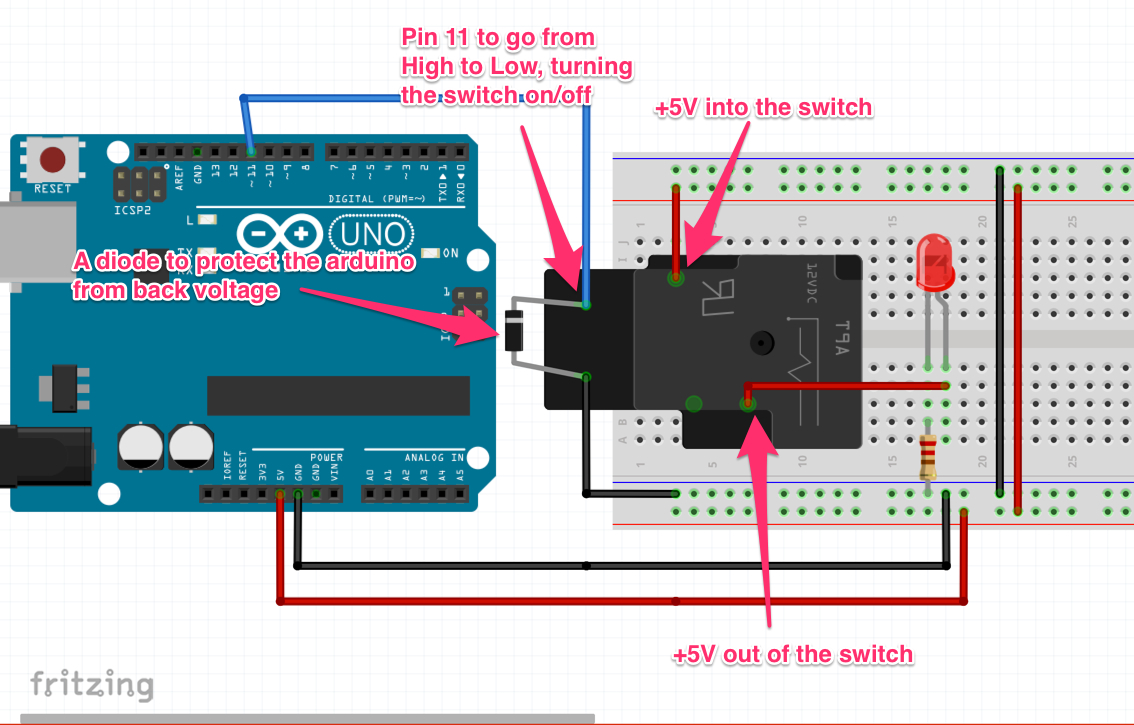
You can see above, I’ve got pin 11 wired to one side of the coil on the relay and ground on the other. When pin 11 is “HIGH” it causes the relay switch to flip and allows current to flow through. On the other side I have a simple LED wired to the output of the relay switch and ground. When the switch turns on, current flows through the relay and turns the LED on. I’ve also included a diode across the coil to prevent voltage backflow into the arduino. Sometimes when a current is high enough, the coil can build up a voltage, when pin 11 goes to “LOW” that voltage needs someplace to go, without a diode, the voltage could flow back into the arduino, damaging it. The diode prevents flow in this direction.

Here’s a quick video explaining the actual test:

And here’s the code:

[pastacode lang=”cpp” message=”” highlight=”” provider=”manual”]

// Pin 11 has an LED connected on most Arduino boards.
// give it a name:
int led = 11;

// the setup routine runs once when you press reset:
void setup() {                
  // initialize the digital pin as an output.
  pinMode(led, OUTPUT);     
}

// the loop routine runs over and over again forever:
void loop() {
  digitalWrite(led, HIGH);   // turn the LED on (HIGH is the voltage level)
  delay(1000);               // wait for a second
  digitalWrite(led, LOW);    // turn the LED off by making the voltage LOW
  delay(1000);               // wait for a second
}

[/pastacode]

That’s it, next I’ll post something about what I did with this circuit!

Recursive Function to Capitalize Words in an Array

Every once in a while, someone writes something bullet proof in as little as a couple lines. Here’s something I got off code academy that I thought might be useful to people:

// Our array of messy words
var capitals = ["berlin", "parIs", "MaDRiD"];

// Capitalize function
function capitalize(word) {
  return word.charAt(0).toUpperCase() + word.slice(1).toLowerCase();
}

// Our recursive function
function fixLetterCase(array, i) {    
  // Base case
  if (i === array.length) {
    return;
  } 
  // Action
  array[i] = capitalize(array[i]);
  $('p').append(array[i] + '<br />');
  
  // Recursive case
  return fixLetterCase(array, i + 1);
}

// Here is our function call
fixLetterCase(capitals, 0);

See the Pen oXLydm by Mike Newell (@newshorts) on CodePen.

There are two things going on here, the “capitalize” function, which takes any string and capitalizes the first letter, then lower cases the rest of the string by slicing it at “1”. The other function is a recursive function that iterates through all the elements in the initial array and runs the capitalize function on every single one.

The bullet proof part is the “capitalize” function, it will work on almost any situation where a string is passed to the function without counting letters, character by character. It let’s JavaScripts native string functions do all the work. Very well written.

Custom Linked Images in WordPress Page Gallery

Let’s say you spent all weekend building your girlfriends portfolio site and you want an easy way to output linked images on a page. You might think “easy enough, I’ll just put in a gallery on the page. She can manage her images from there!” But then you hand your site to your gf and she says “can I link those images to other sites?”…

We’ll, yeah. Here’s how.

She will manage images on the page through the wordpress gallery. For every image she wants to link out some place, you will have her put the link in the “alt text” input field on the backend:

alt_textThen you will pick this alt text out of the post meta and read it into your template. Here’s an example:

[pastacode lang=”php” message=”” highlight=”” provider=”manual”]

<?php
    $gallery = get_post_gallery( get_the_ID(), false );
    $idsArr = explode(',', $gallery['ids']);
    $template = '';
    
    if($idsArr) {
        foreach($idsArr as $key => $id) {
            
            $url = wp_get_attachment_url( $id );
            $alt = '#';
            $alt = get_post_meta($id, _wp_attachment_image_alt, true);
            
            $template .=    '<a href="' . $alt . '"><img src="'.$url.'" /></a>';
            $template .=    '<br />';
            
        }
    }
    
    echo $template;
?>

[/pastacode]

This code lives in “content-page.php” of my theme file, but you may have reason to put in into your “page.php” file directly.


Slow Recursion

Let’s say you want to do something in a for loop, but you can’t seem to make it run with a delay in between loop iterations (let’s assume you’re working in something like JavaScript where the “setTimeout” function is non-blocking and will execute immediately).

Not to worry, the standard approach would be to write a recursive algorithm and do “setTimeout” before you call the next iteration of the recursion.

My solution is usually to embed a recursive algo in a closure, or self executing function. This way everything stays tight and you can define it in another higher level function so as not to make your code messy. See below:

[pastacode lang=”javascript” message=”” highlight=”” provider=”manual”]

var delay = 1000;              
var count = 100;
(function loop(i) {
    setTimeout(function() {
        // do something here
        if(--i) {
            loop(i);
        }
    }, delay);
})(count);

[/pastacode]

What’s nice about this is the fact that it negates the need for globals dedicated to the recursion. It’s also embeddable, see this example below where I output messages every 2 seconds:


function logMessages(msgs) {
    (function loop(i) {
        setTimeout(function() {
            var idx = i - 1;
            console.log(msgs[idx]);
             
            // if i != 0 loop again
            if(--i) {
                loop(i);
            }
        }, 2000);
    })(msgs.length);
}

logMessages(["things", "stuff", "awesome"]);

See the Pen waGBNa by Mike Newell (@newshorts) on CodePen.

Web Speech API

Made a quick library (https://github.com/newshorts/WebSpeechJS) last week that’s working alright for me. Thinking of making it an actual project on github. Just wanted to post a little blurb about it here, before I add documentation and make it a real thing.

It’s called WebSpeechJS. Basically, it just makes it easy to loop the web speech API return (primitive and final) text and call it into a callback.

Use it like this:

[pastacode lang=”markup” message=”” highlight=”” provider=”manual”]

<!-- include the js file -->
<script src="path/to/js/webspeech.js"></script>
<script>
    // when the window loads call the script
    var options = {
        startButton: $('.start'),
        stopButton: $('.stop'),
        tmpOutput: $('.tmp'),
        finalOutput: $('.final'),
        onResult: handleWebSpeechResult
    };
    var ws = new WebSpeech($, options);

    // start the processes
    ws.init();
</script>

<!-- then in your page template, include necessary the elements -->
<p class="tmp"></p>
<p class="final"></p>
<button class="start">Start</button>
<button class="stop">Stop</button>

[/pastacode]

That’s it for now, easy peasy.

DEMO

IOS Safari Partial Support of Web Speech API

I’ll keep this short. If you’re looking to use the speech recognition capabilities of the Web Speech API on safari mobile (or safari for that matter) 7.1+ forget it. If you check out caniuse.com you’ll see that mobile safari only supports the speech synthesis part of the API (text –> speech). Android on the part support speech recognition in the browser. Just make sure to use the prefix “webkit” when calling the variable so:

[pastacode lang=”javascript” message=”” highlight=”” provider=”manual”]

var SpeechRecognition = SpeechRecognition || webkitSpeechRecognition || null;

[/pastacode]

should work for you.

jQuery “extend” as an Object Merger

Let’s say you’re creating a class and want to load in some “options”. You could write you’re own defaults and up with a huge top heavy class…or you could let jQuery do the work for you.

[pastacode lang=”javascript” message=”” highlight=”” provider=”manual”]

function MyClass($, options) {
    
    var __ = this;
    
    var defaults = {
        // callback
        onResult: function(data) {},
        // attribute
        color: 'red'
    };
    __.options = $.extend({}, defaults, options || {});
    
}

// red
var mc = new MyClass(jQuery);

// black
var black = new MyClass(jQuery, {color: 'black'});

[/pastacode]

Simps.

GSP First Floor

Just thought I’d capture the first floor in a 360 photo sphere and then put it up to show people our space!

DEMO

Embed Adobe Edge Animation on Your Page

NOTE: if you’re looking for the “triggering events from within an adobe edge animation to the page” look here:

https://iwearshorts.com/blog/triggering-events-from-within-edge-animations-to-the-page/

This tutorial will show you how to embed an adobe edge animation onto an existing page within your site.

TL;DW

Publish the adobe edge animation (File -> publish). Find the file, and copy the adobe runtime block and the stage div:

1.

[pastacode lang=”markup” message=”” highlight=”” provider=”manual”]

<!--Adobe Edge Runtime-->
    <meta http-equiv="X-UA-Compatible" content="IE=Edge">
    <script type="text/javascript" charset="utf-8" src="edge_includes/edge.5.0.1.min.js"></script>
    <style>
        .edgeLoad-EDGE-174933755 { visibility:hidden; }
    </style>
<script>
   AdobeEdge.loadComposition('demo', 'EDGE-174933755', {
    scaleToFit: "none",
    centerStage: "none",
    minW: "0",
    maxW: "undefined",
    width: "550px",
    height: "309px"
}, {"dom":{}}, {"dom":{}});
</script>
<!--Adobe Edge Runtime End-->

[/pastacode]

2.

[pastacode lang=”markup” message=”” highlight=”” provider=”manual”]

<div id="Stage" class="EDGE-174933755">
	
        <div id="Stage_Text" class="edgeLoad-EDGE-174933755">Hello World</div>
        <div id="Stage_microphone-grey2" class="edgeLoad-EDGE-174933755"></div>
    </div>

[/pastacode]

That’s it, once you tell it to look in the right place for the files, the page should be able to run the animation sequence. Make sure you change the url in the loadComposition call to the the right local file url:

[pastacode lang=”javascript” message=”” highlight=”” provider=”manual”]

AdobeEdge.loadComposition('{my}/{custom}/{url}/demo', 'EDGE-174933755', {

[/pastacode]

fantastic.